

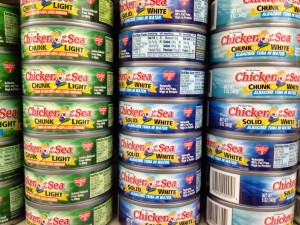
Canned goods are one of the most convenient and shelf-stable foods for your pantry. But they can become annoying. Trying to stack them and store them in order while they fall or take up too much space.
Since most of our canned goods are the standard sized can (16oz), rather than the large #10 cans, I thought we could do without a rotation rack for a while. Nope. Cans were falling all over the cupboard. The use-by dates were getting mixed up and the whole thing was a rolling, denting and foot bruising fiasco.
With space and budget at a premium, I looked for the best way to organize a small mountain of store-bought canned goods. I also knew that we needed the storage option for them to be portable, not a mounted, heavy wall rack. In the hunt for a solution, I found The Can Organizer.

Below are my opinions, the pros and cons, a product review if you will, of The Can Organizer.
Pros:
For the amount they store, they are far less expensive than that of the metal canned goods storage shelves/units.
There are multiple size options to fit on almost every depth of a standard shelf or cupboard.
Portability is possible. You can pick one of these up, fully loaded with cans and move it to a more suitable location if you move or rearrange your kitchen.
They are quite surprisingly sturdy. Although made of cardboard, we simply used shipping tape to reinforce the edges and areas where they fold together. Ours are 10 years old now and have been moved multiple times.
You can organize by buying just a few at a time. They come in packs so you can start small and grow your pantry as time and budget allow.
One box holds a LOT of cans! More soup cans fit than anything else, but also short meat cans can be stacked into fours and roll through nicely.
Con:
Larger and #10 size cans do not fit.
Pro or a Con … based upon Your Opinion:
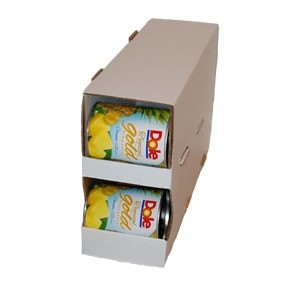 Some people don’t like that the each of the organizers comes unassembled. But there is a short video on the site which instructs you via step by step, how to assemble them quite easily. You can view that video even before you buy to help you make up your mind first.
I personally like that they fold down flat for moving them. In my opinion, it was much easier than building (or breaking down) a huge wall unit.
In conclusion – I highly recommend The Can Organizer as a budget-friendly, portable option for organizing and storing store-bought canned goods.
____________________
About Donna Miller

Donna Miller is the wife of 30 years to the love of her life Joseph, the mother of three home-school graduates and has one daughter-in-law and one son-in-law.
She is the hostess of the radio shows “Your Preparation Station”, and “Encouragement in the Kitchen”. Both found on iTunes & BlogTalkRadio.com
Donna teaches local classes & ladies retreats for people to learn hands-on lost skills. She is a teacher, author, sought-after speaker and trainer.
The Millers are the owners of Millers Grain House, are the founders of PREPARE Magazine and the Organizers of WNC Preparedness Group in Asheville, NC.

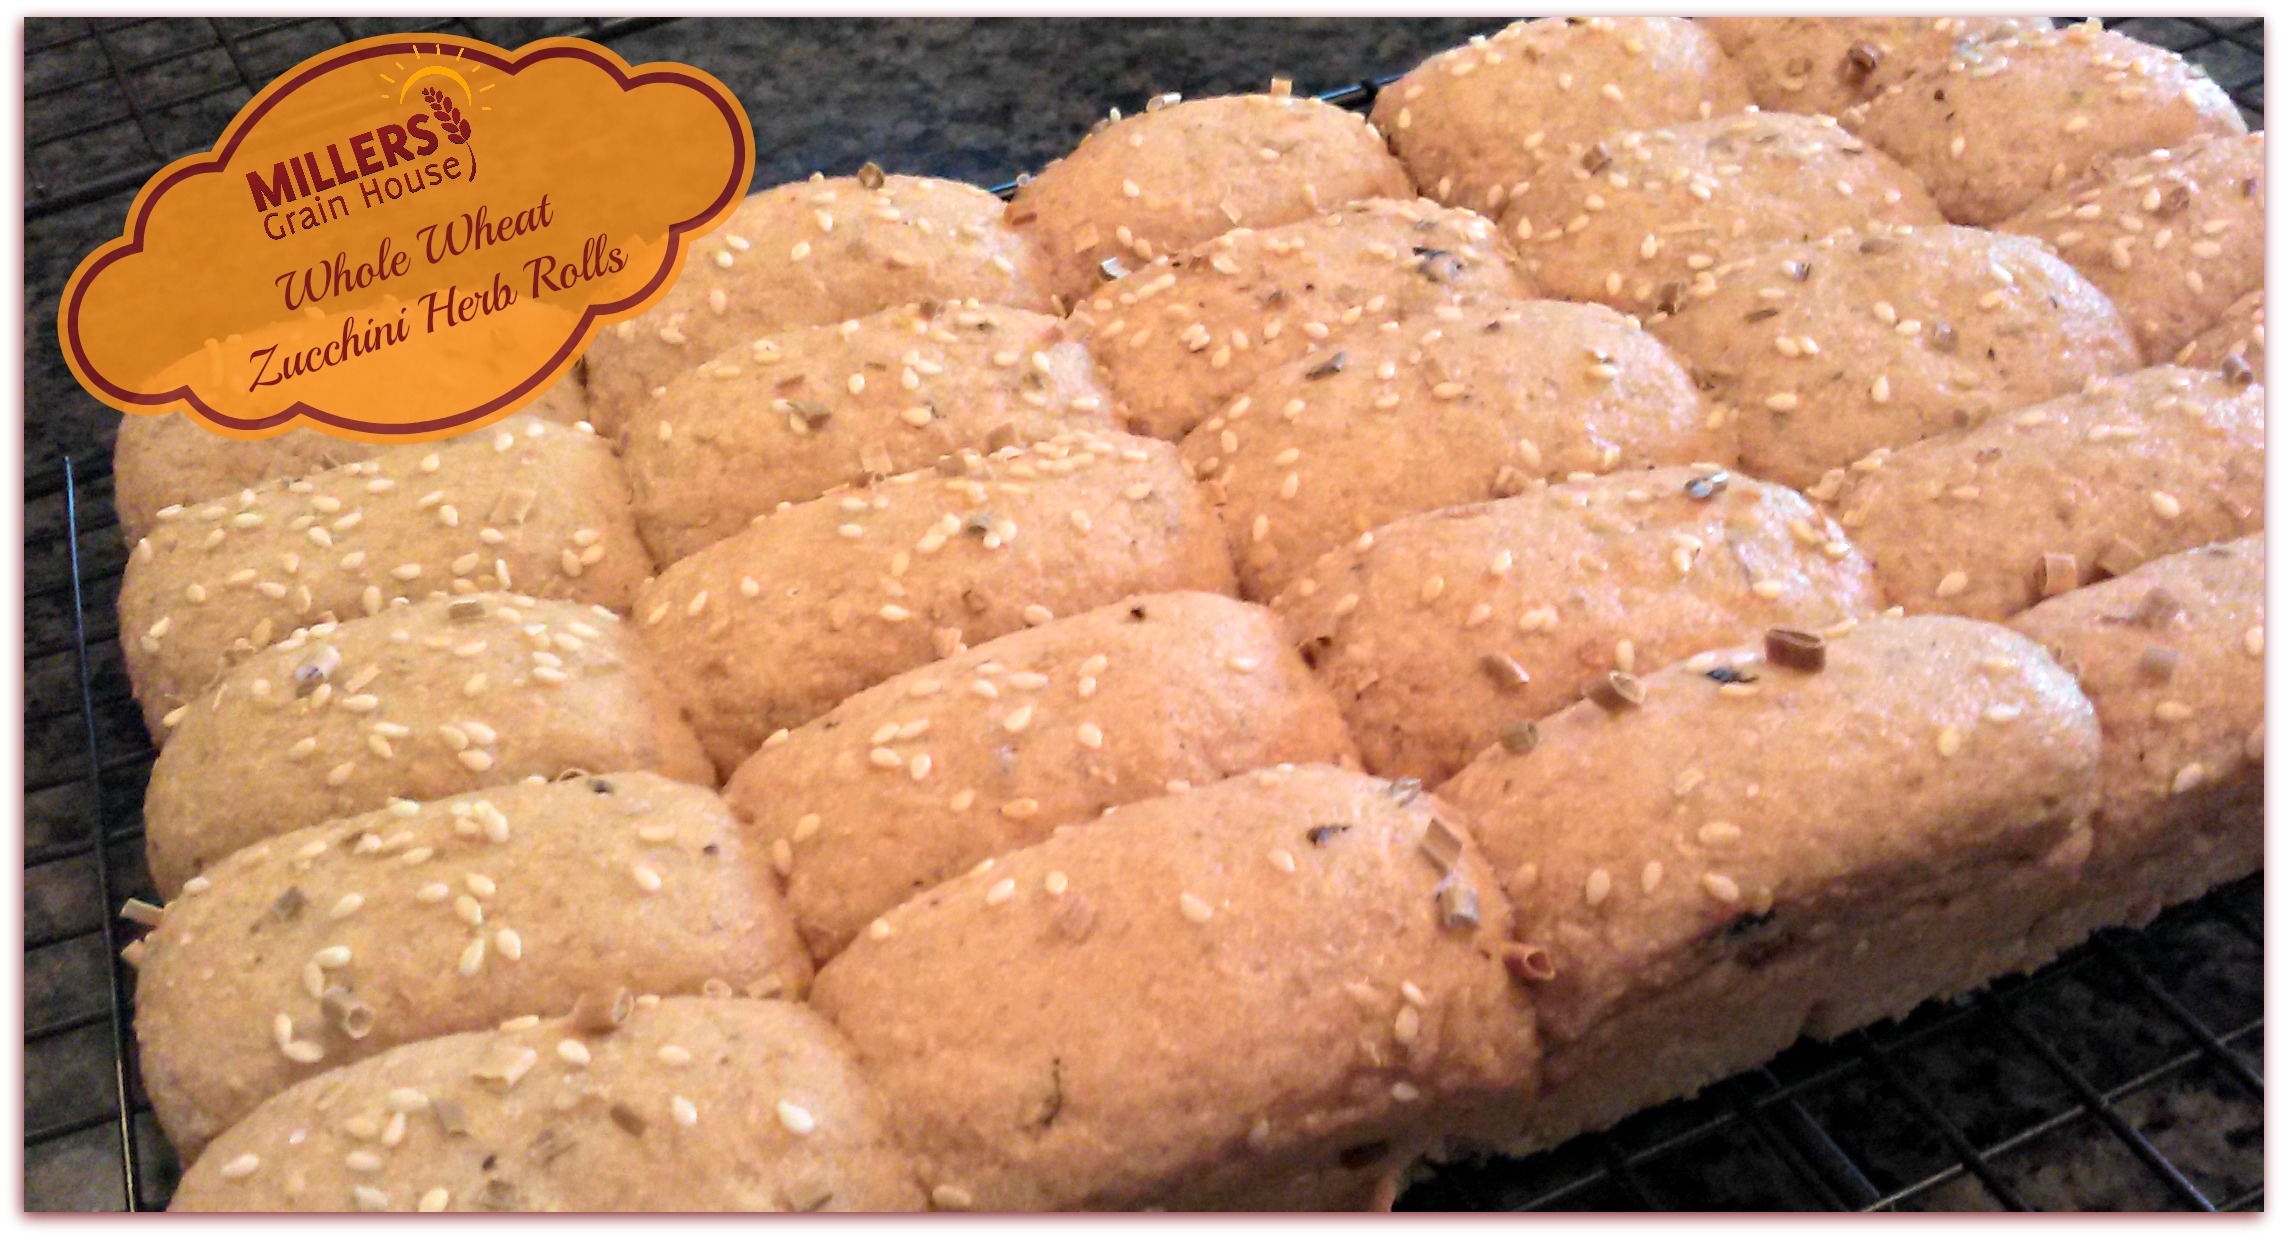
These Whole Wheat Zucchini Herb Rolls can be made Vegetarian or Vegan but don’t let that keep you from serving them with your most hearty (or meaty) meal!
Well, it’s been a while since I’ve blogged a recipe. My sincerest apologies! We’re moving over to OUR NEW WEBSITE and I’m a bit more disheveled than usual. But summer is really upon us and zucchini are usually prolific growers so I had to do something with the ones we had that were about to go bad.
Typical zucchini bread is a sweet, batter bread that is akin to banana bread. My more savory version is meant to be a highlight to a meal rather than a sweet snack. I hope you enJOY!
Ingredients:
- 1/2 Cup warm water (between 100 -114 degrees)
- 2 TBS Honey (Vegan – use Evaporated Cane Juice/Crystals)
- 1 TBS Olive Oil
- 1 1/2 tsp Instant Yeast
- 3/4 Cup Shredded Raw Zucchini
- 2 3/4 Cup Freshly Milled Hard White Wheat Flour
- 1/2 tsp Dried Italian Herbs
- 2 tsp Sesame Seeds (divided – using 1 tsp each)
- 1/2 tsp Sea Salt
- 1/4 tsp Garlic Powder
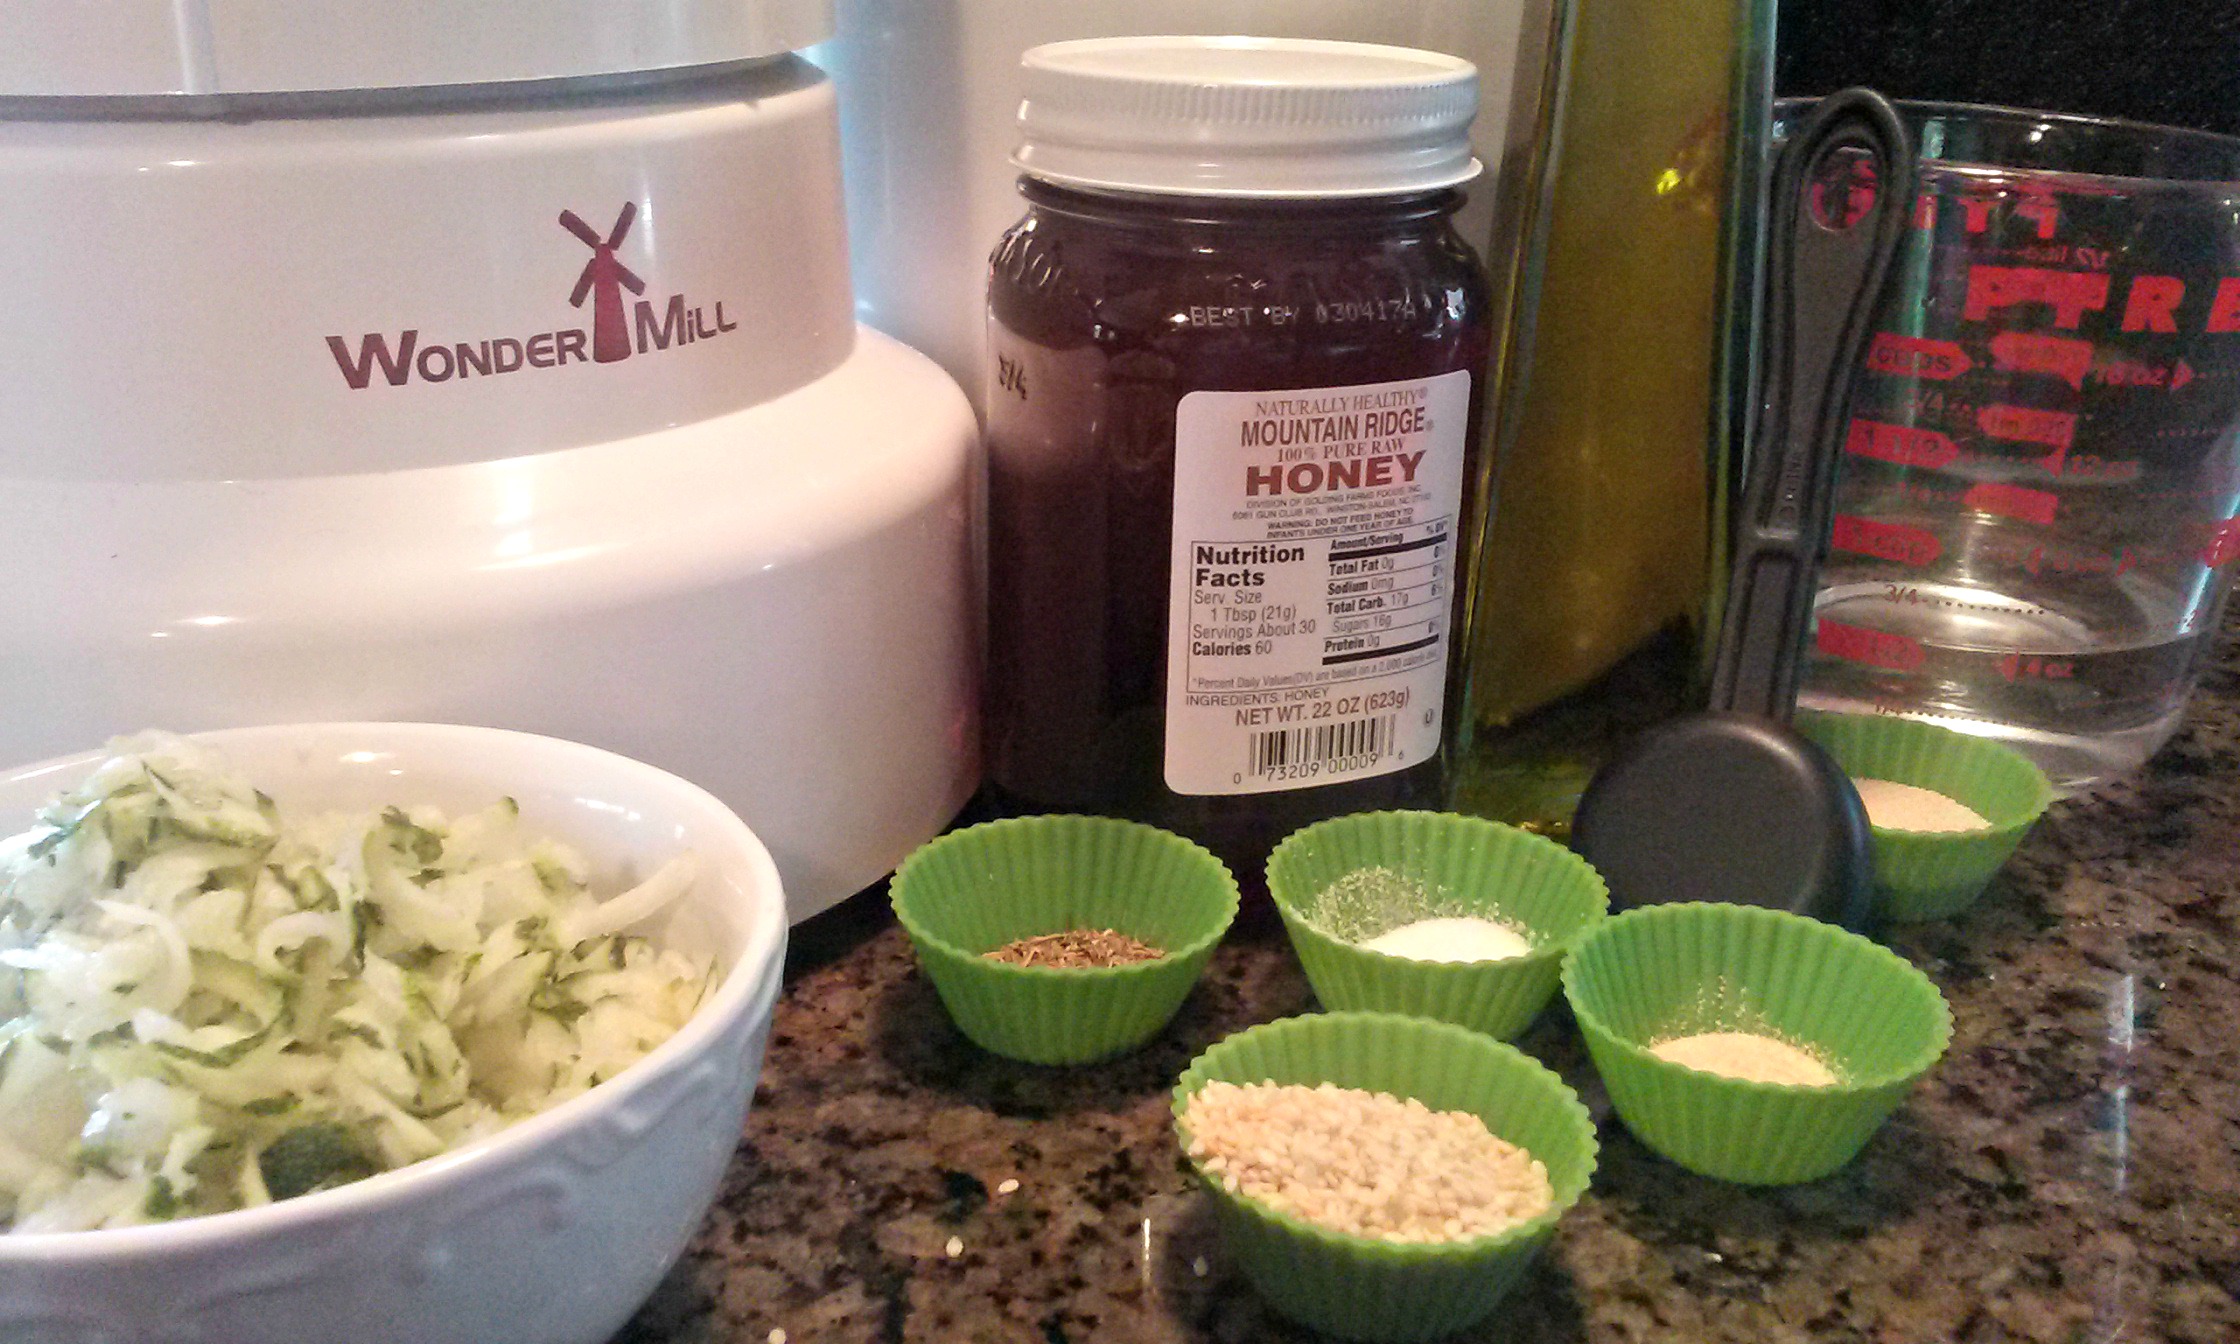
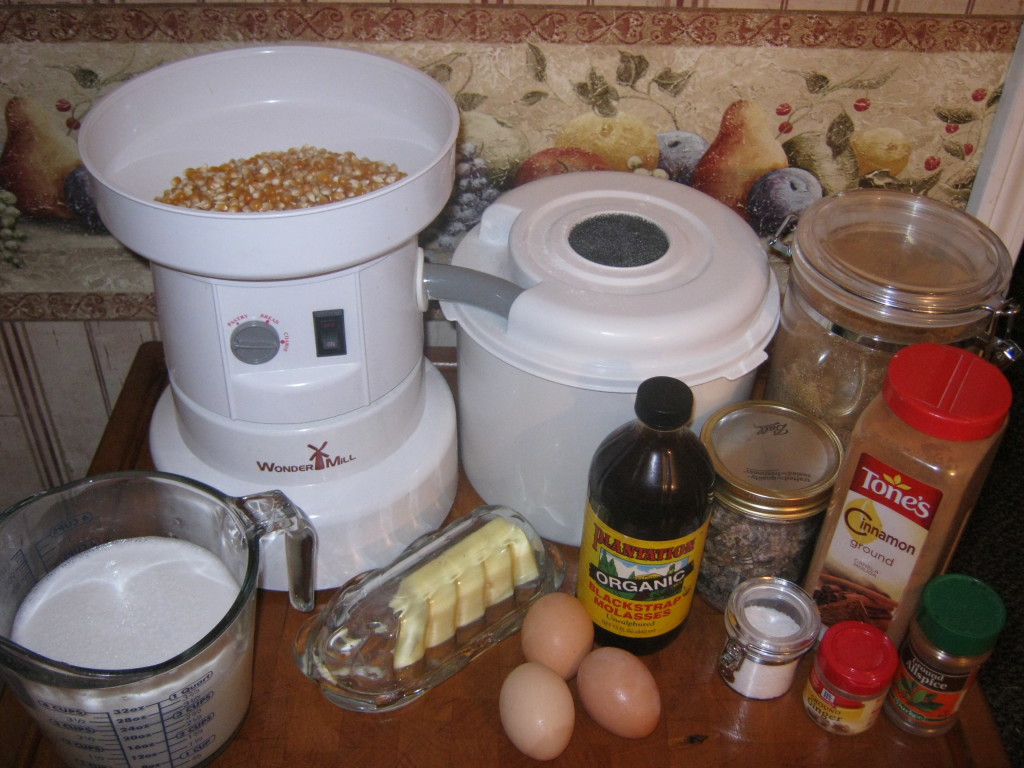
After milling your flour (I use the Wondermill) gather all your ingredients to make sure you have enough of everything before you begin.
You may use a bread machine for this entire recipe by simply putting the ingredients into the pan in the order listed. Turn on to dough setting. Then when finished remove and shape as below.
For the sake of how I made these (gotta match the pictures) and for those who love the ‘by hand’ method….here are more instructions:
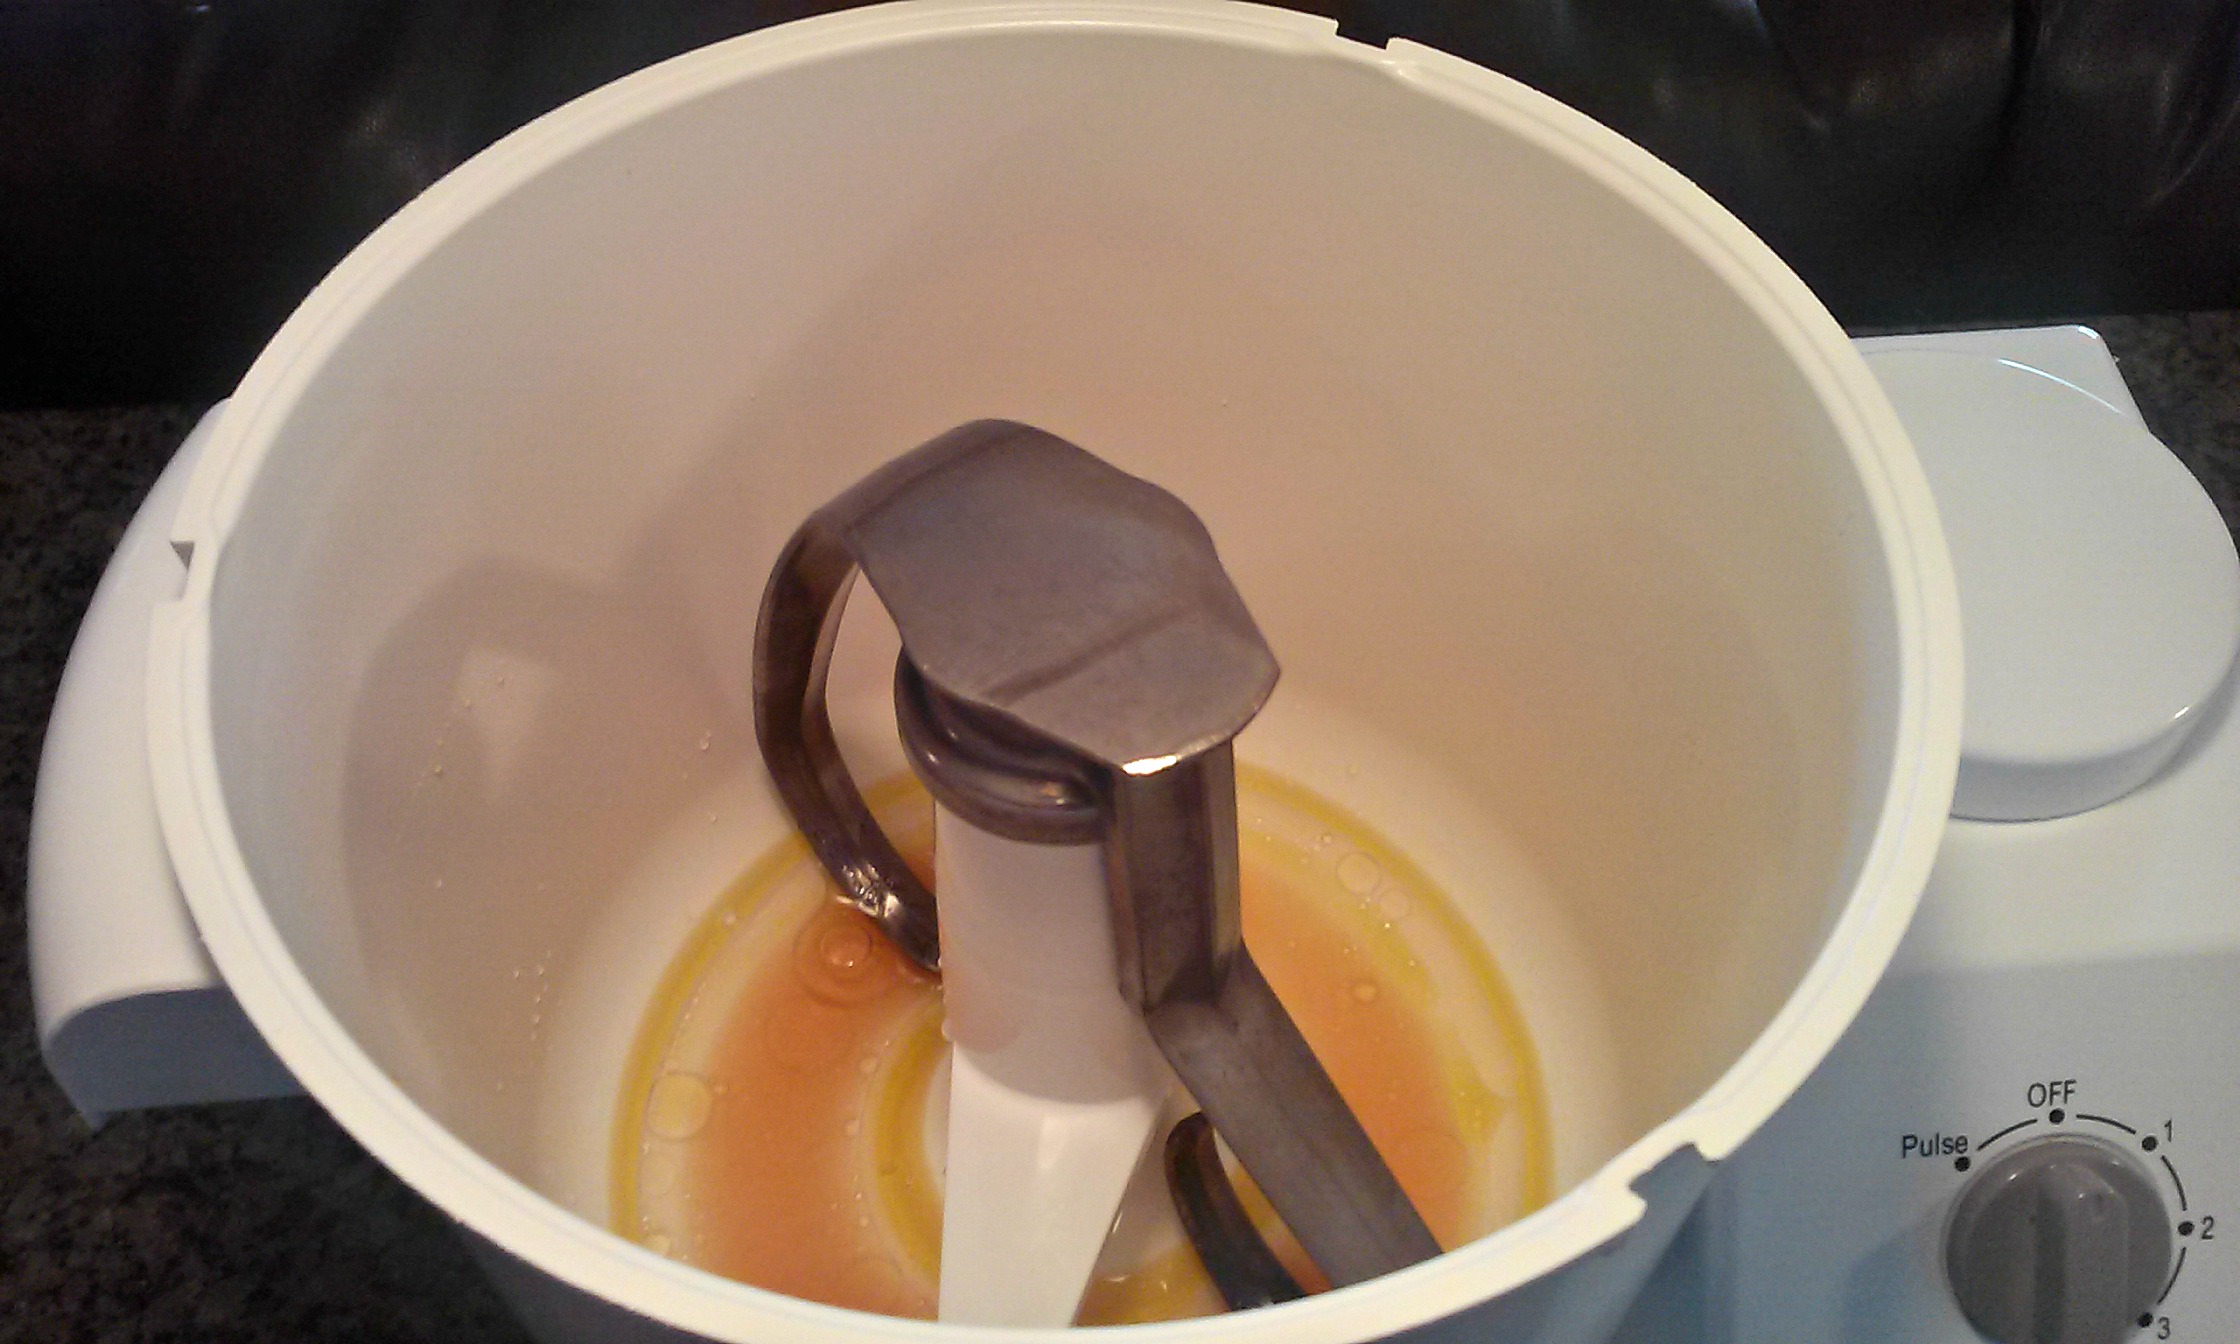
1) Combine the first three (3) ingredients into a bowl or in my case, I’m using the WonderMix.
2) Stir until well combined. Now add the 1 1/2 tsp of Instant Yeast. (be sure the water is lower than 115 degrees to avoid killing the yeast). There is no need to ‘proof’ this because it’s instant yeast so let’s move on.

4) Stir in all the shredded Zucchini
5) Now turn on machine (or by hand) stir in one cup of flour at a time…
6) After at least the first cup of flour (but don’t wait until after all the flour) add the Sea Salt, Garlic Powder, Dried Herbs and one (1) tsp of the Sesame Seeds.
7) Finish adding flour until ready to knead.
8) Knead by hand or by WonderMix. for a minimum of 10 minutes or until gluten has formed to make the dough very springy when poked.
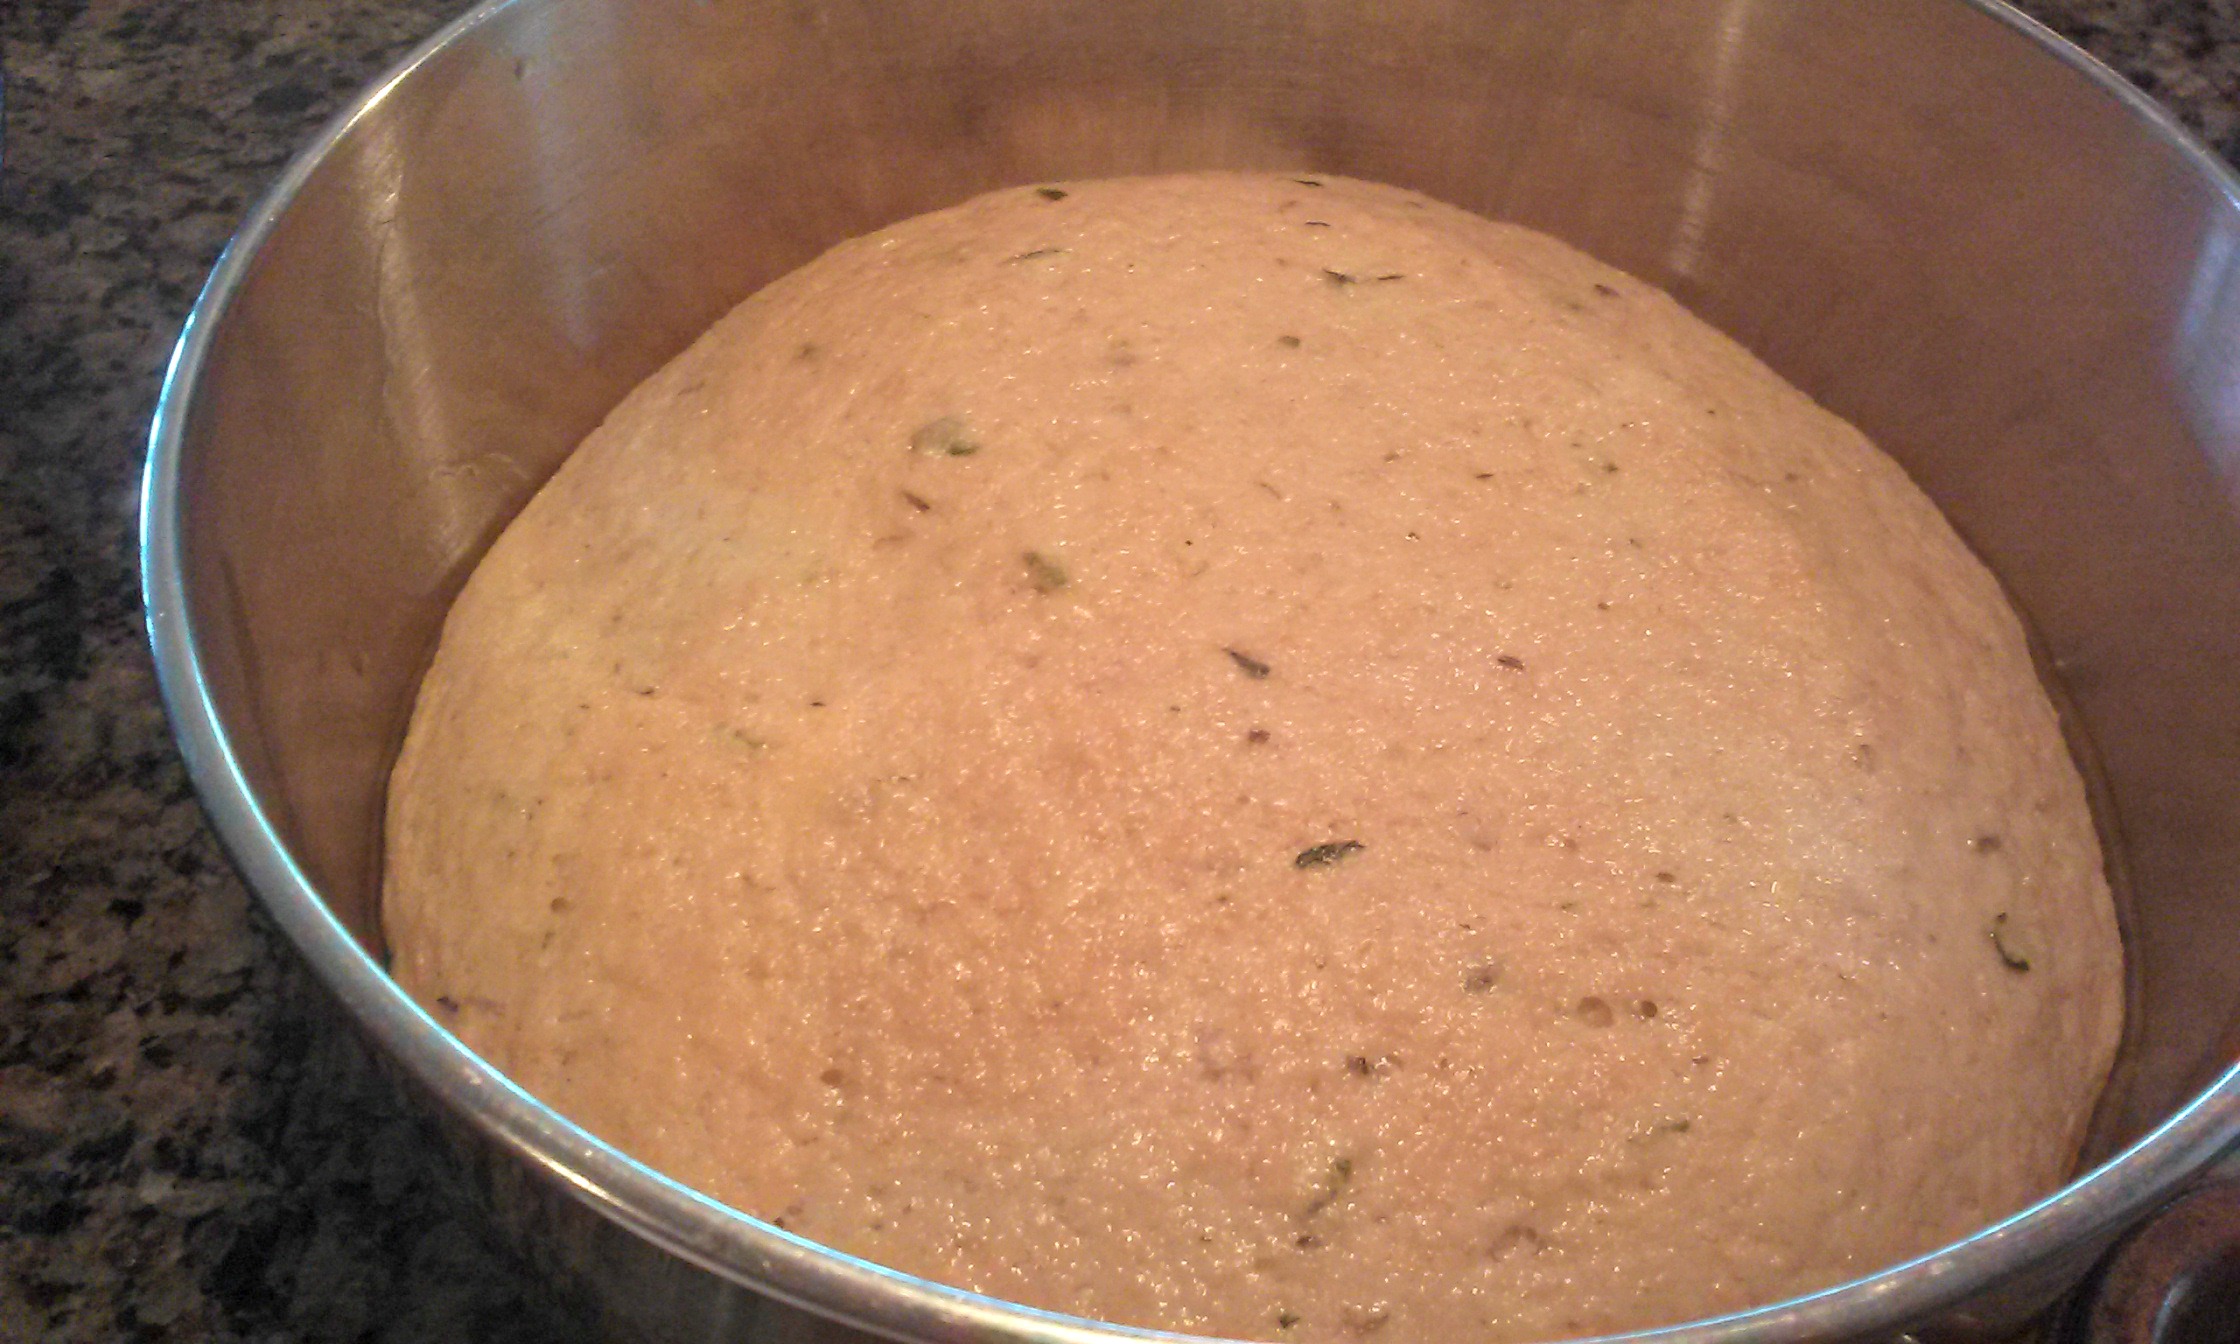 9) When finished place in a bowl and a warm (80 degree) location and allow to rise until doubled.
10) After rising until doubled (approximately 30 minutes at that warm temp) knock out all large bubbles and begin to shape into oblong rolls. Pinching the under belly of the roll to keep the ugly side (and seems) down onto the pan.
11) Arrange them side by side, almost touching, in a low metal pan that has been sprayed or greased.
12) Brush with an egg wash (Vegan option use Aquafaba or Flax seed gel) and sprinkle with remaining Sesame seeds and other optional herbs (I added some dried chives).
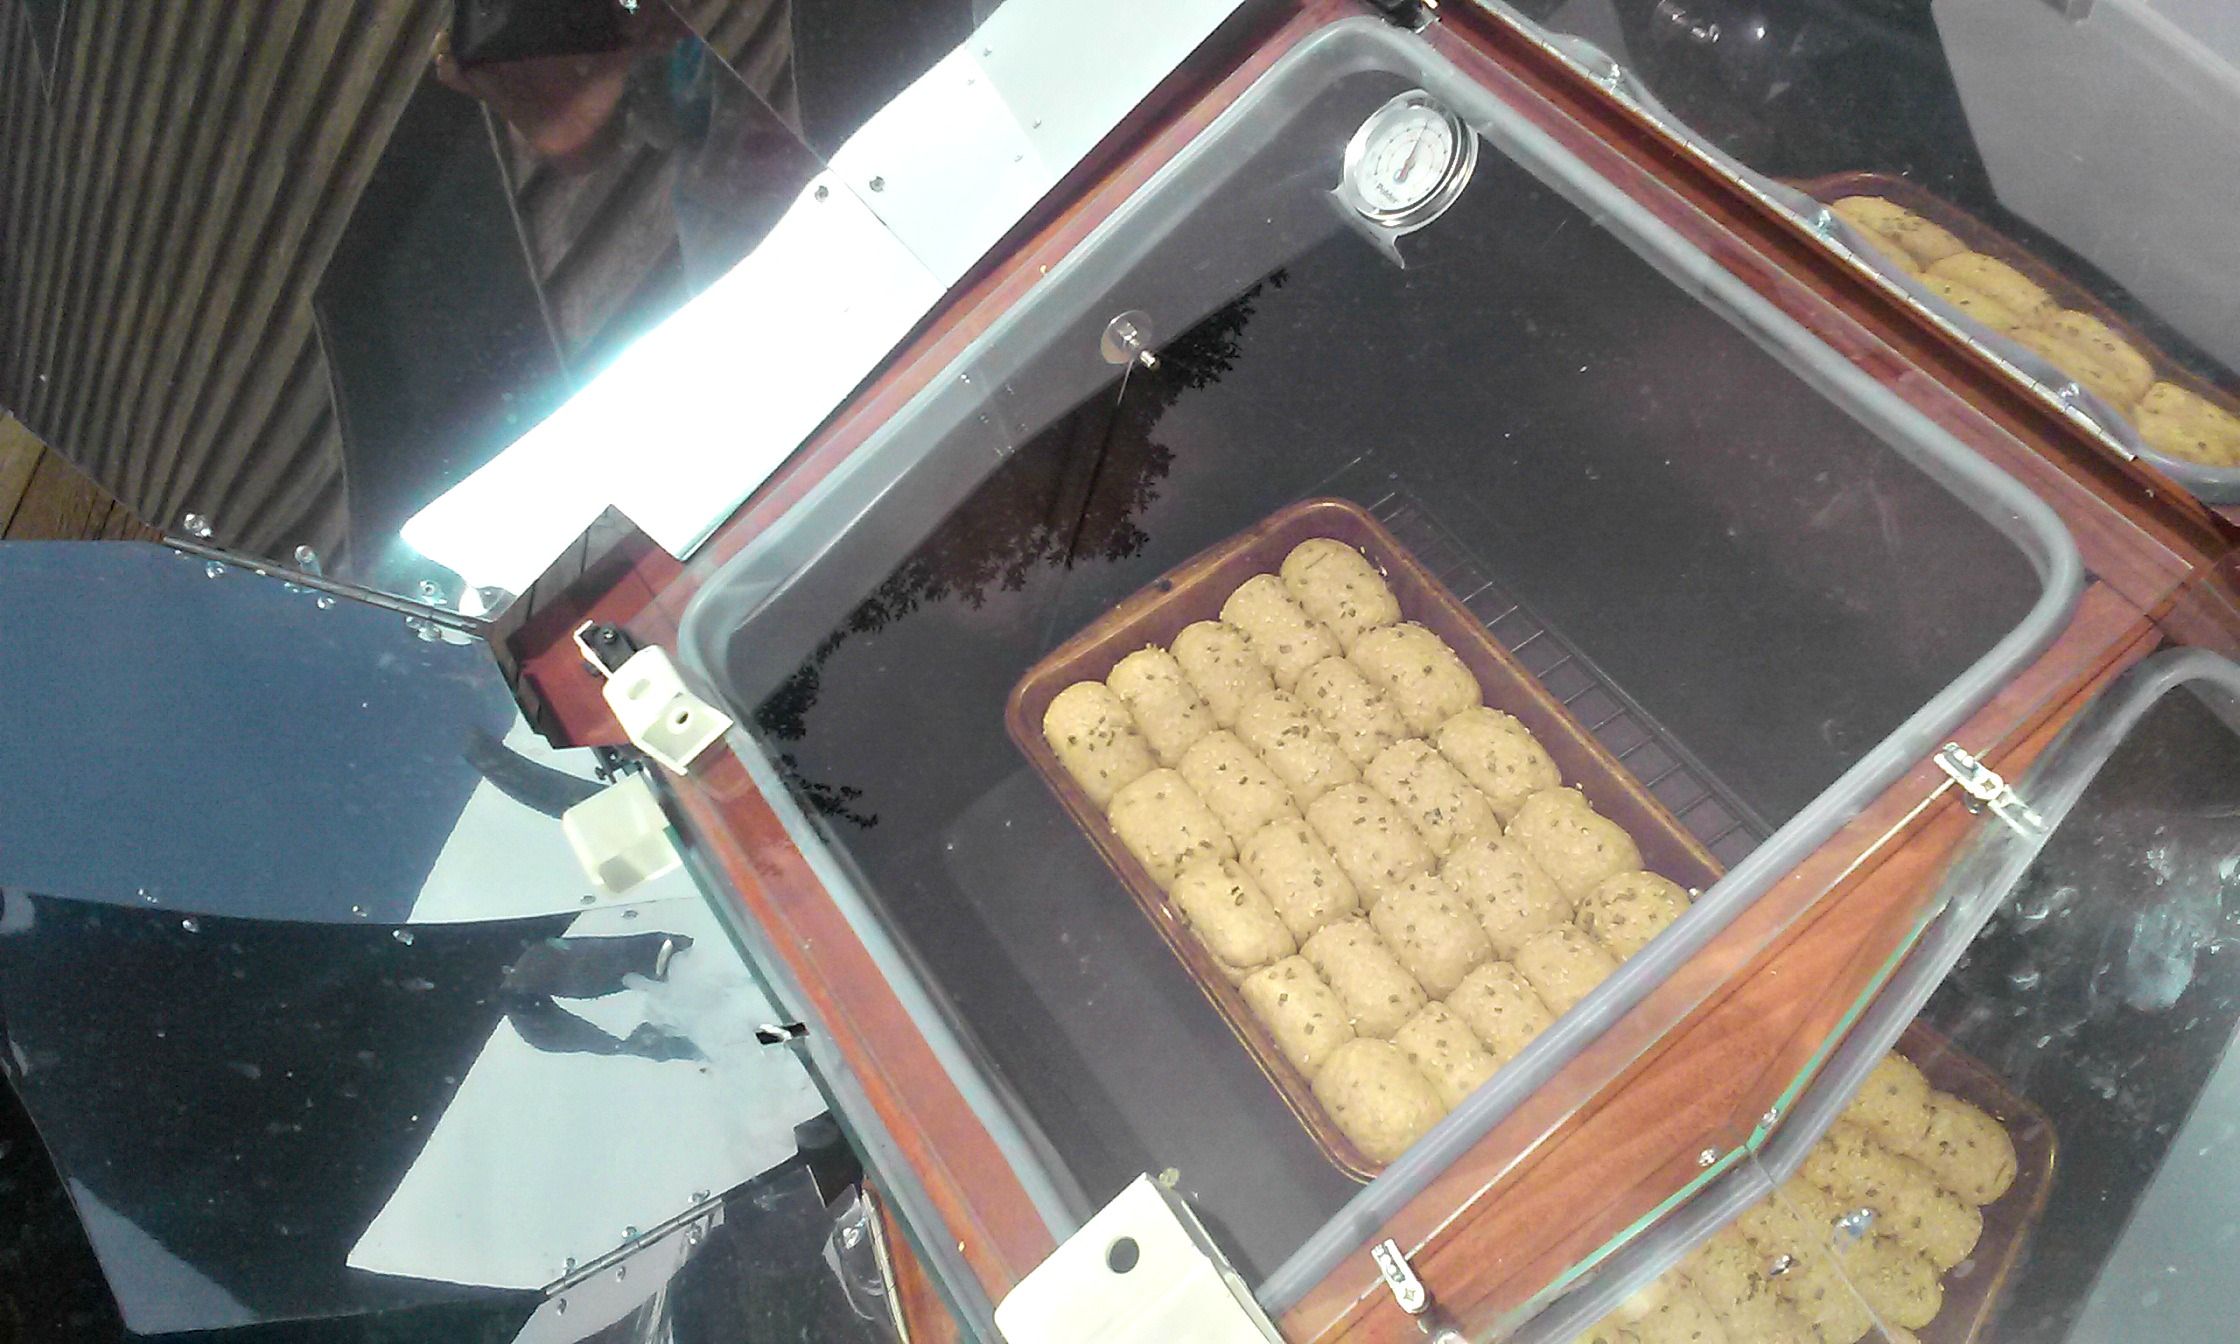 13) Allow to rise until all sides touch.
14) Par bake in a low 250 degree oven for 30 minutes. Our house was hot so I par baked mine in the All American Sun Oven.
15) Remove to cool completely on a wire wrack. Then bag and freeze for warming in the future!
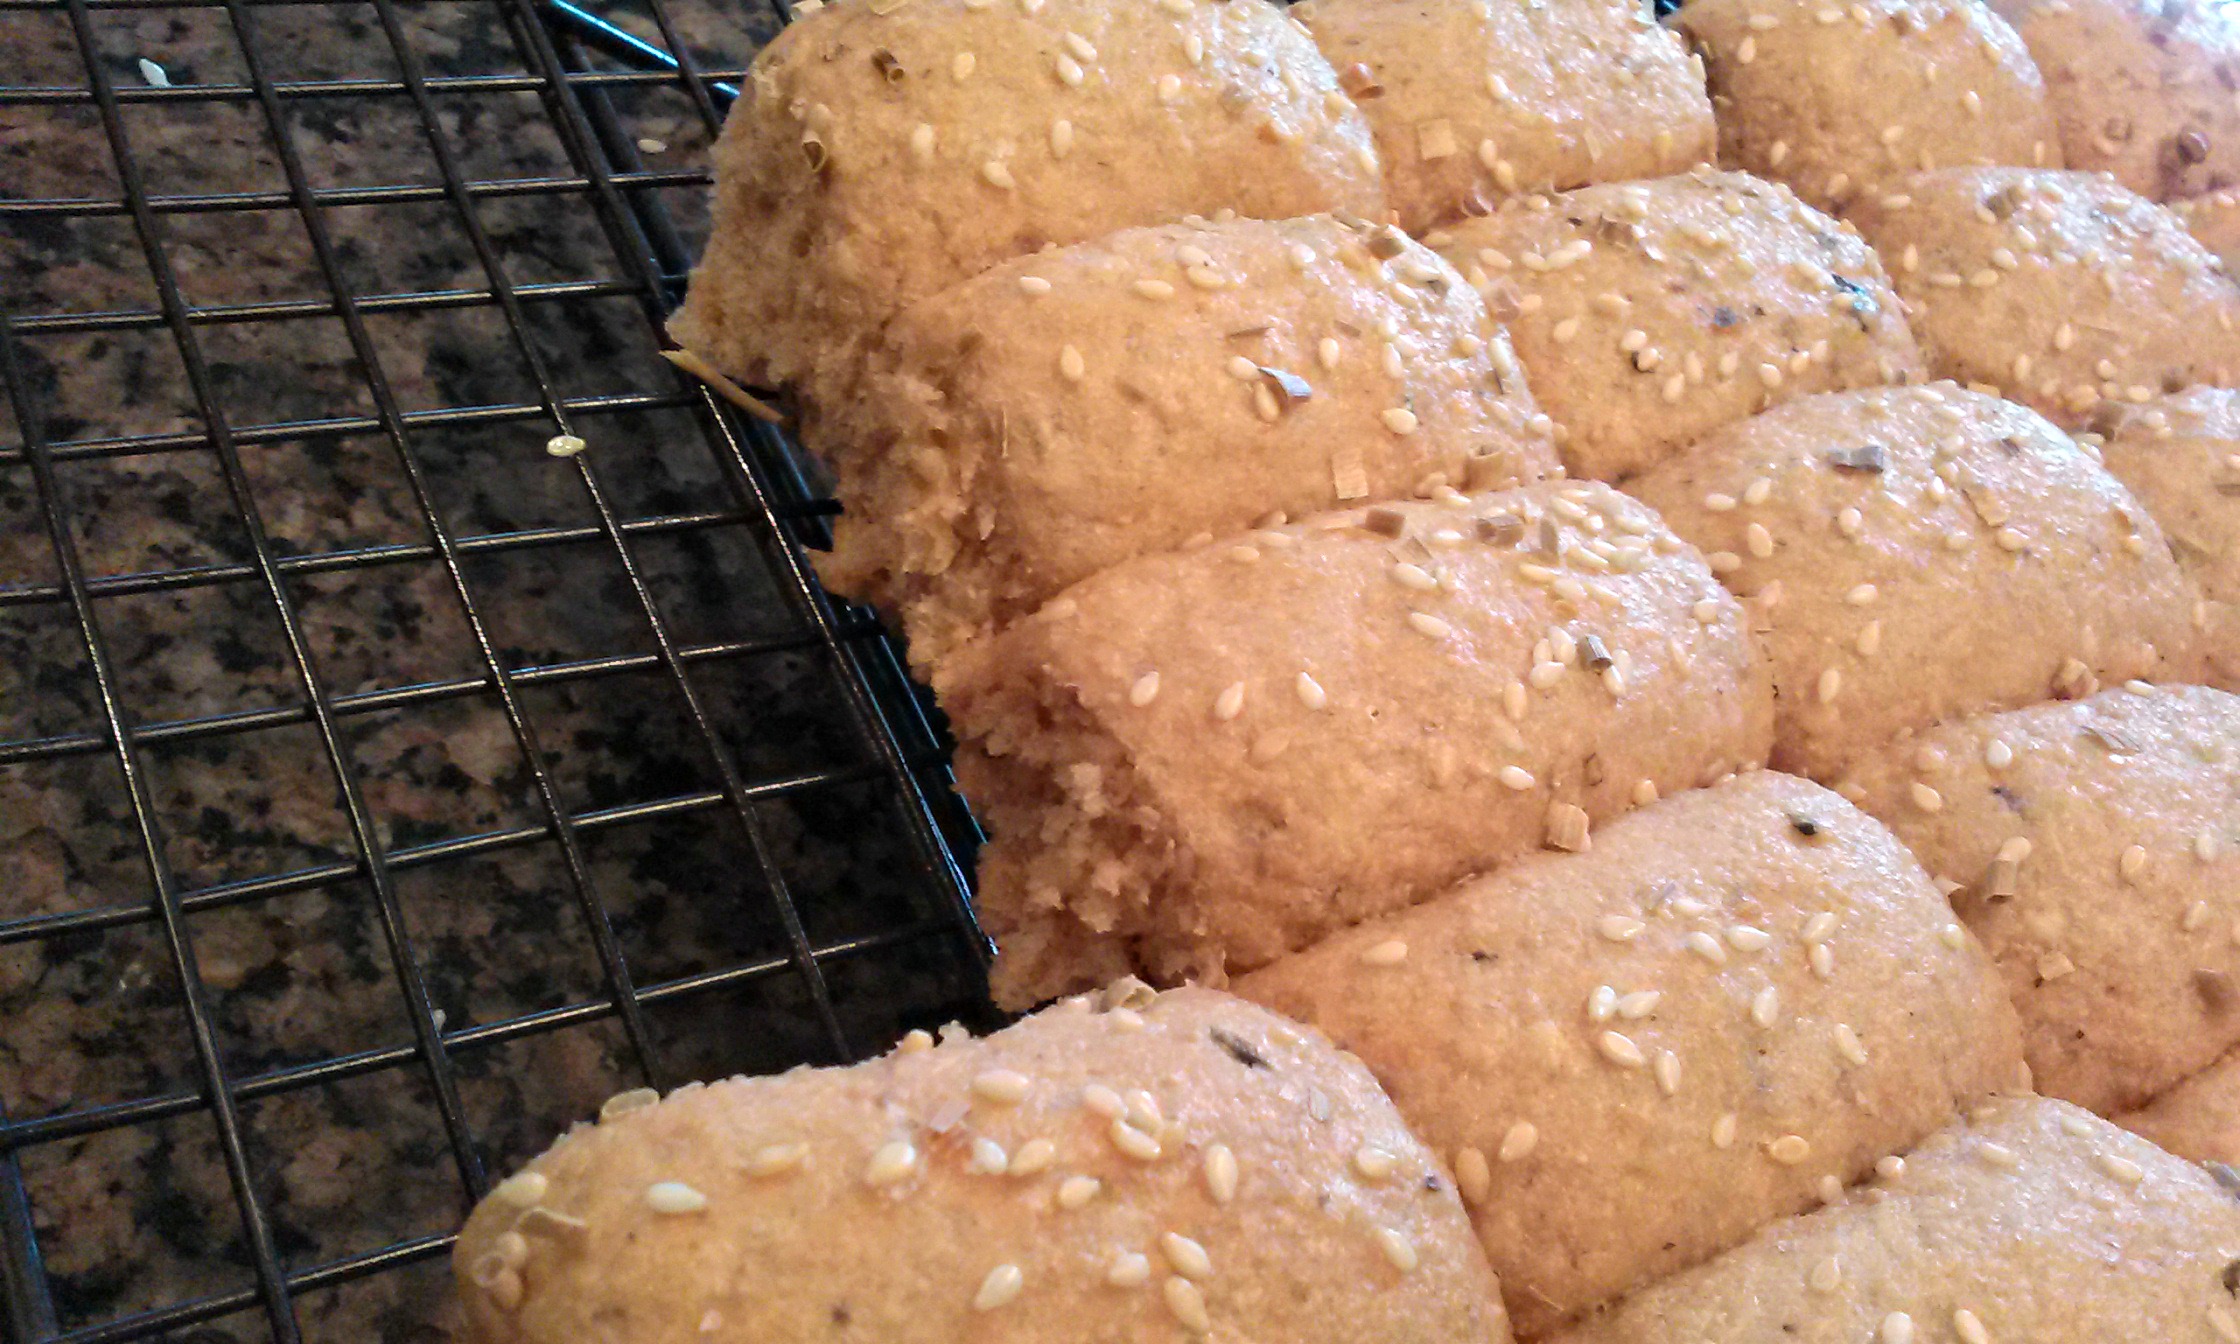
The reason we bake these low and then freeze them is because the recipe makes so many. This allows us to break off what we need and lightly toast/reheat them in the oven just as dinner is finishing. Like the ‘brown and serve’ dinner rolls that are made of junk you can get ready made at the store.
These are better, and can be used the same exact way!
I hope you’ll give this a try! If you do or you make any variations to this recipe, I’d love to hear how it all turns out! Please leave a comment below…
Until next time…
Best Blessings!
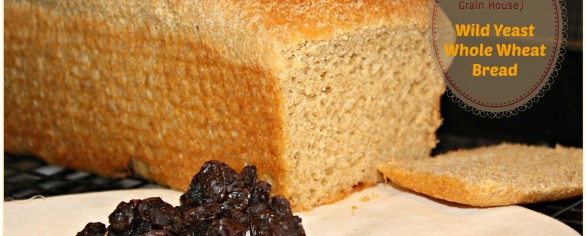
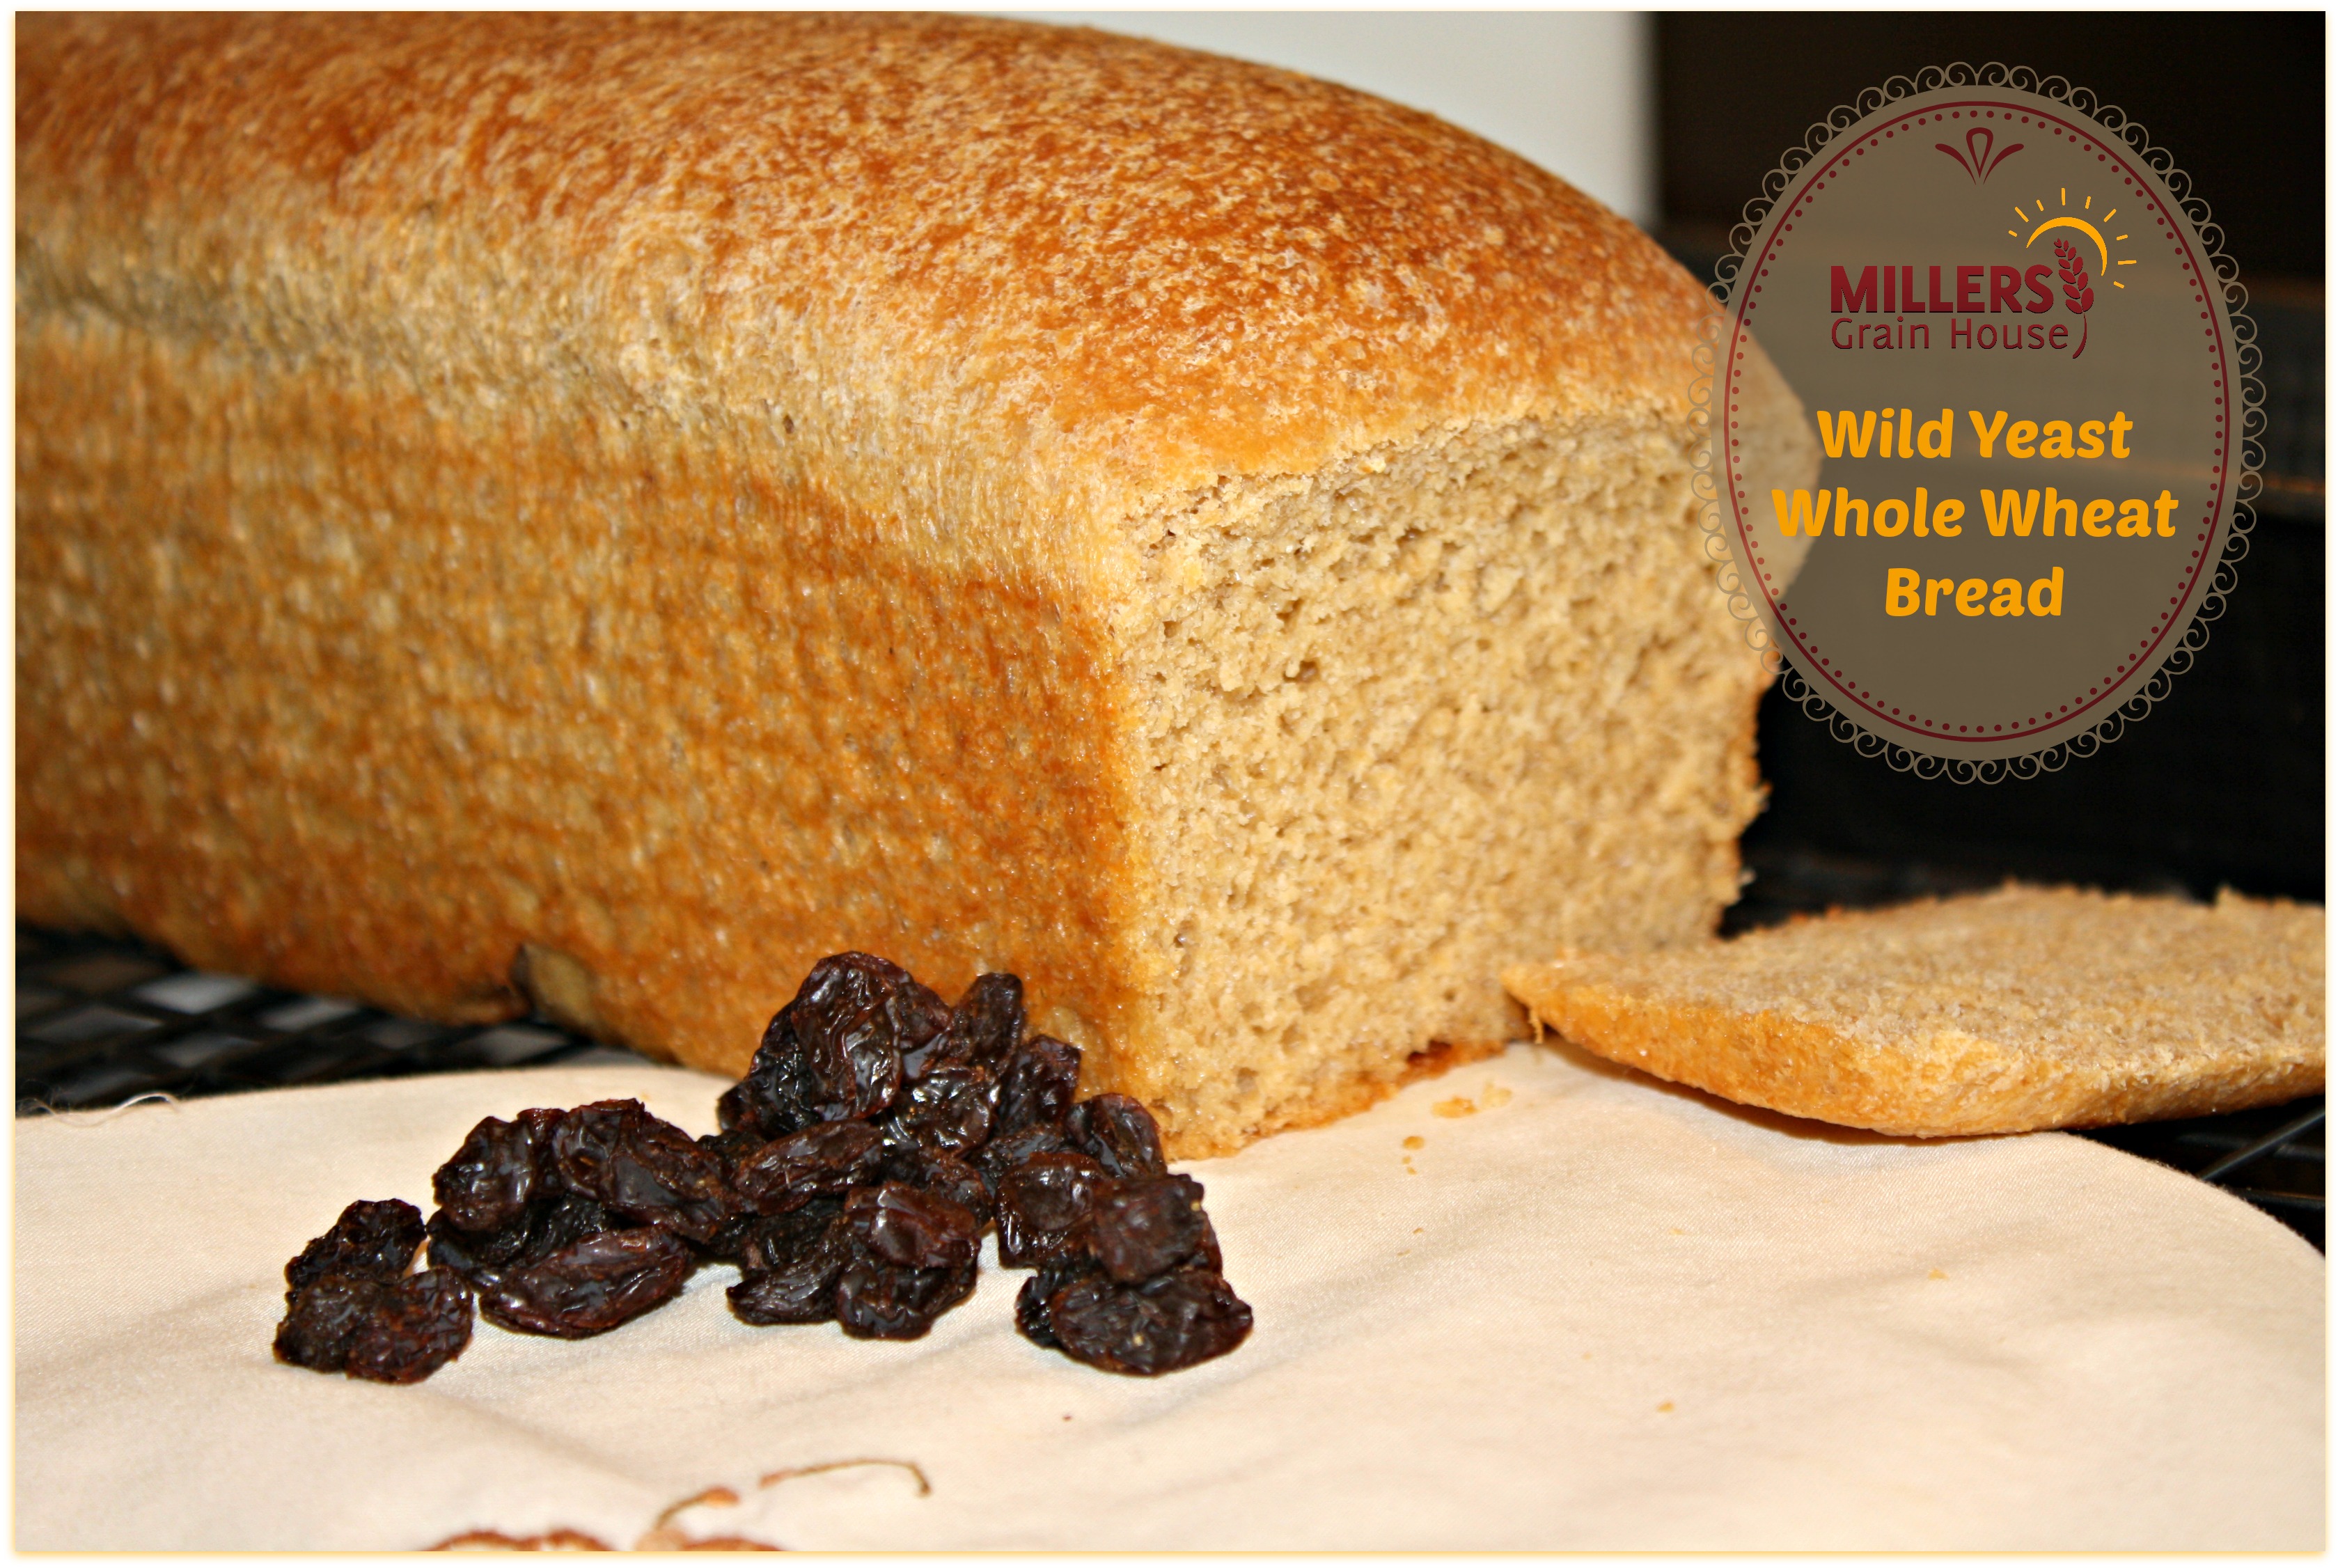
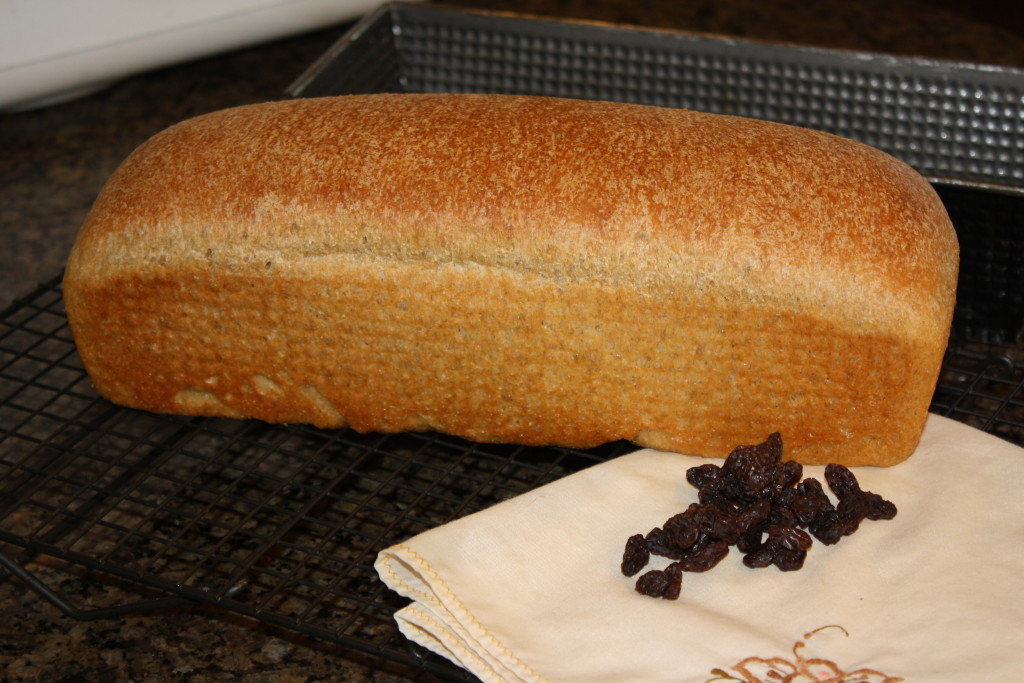
No yeast? No problem! Go Wild! Whole Wheat Bread with Wild Yeast!
I’m often asked what to do if there isn’t any yeast available to buy or you run out in your food storage. Well the fix is simply to revert to using whole foods and capturing wild yeast.
The process takes a bit longer (ok days longer) but it can be done with very good results. Here’s how to cultivate the wild yeast and a recipe to try your own wild yeast.
 This is a 5 -7 day process. Did I say it took a good bit longer? That’s an understatement.
Day 1: 
In a glass jar with a lid, that is large enough to contain a pint – put 1/4 Cup of Organic Raisins and 1. 5 Cups of water.
Screw the lid on the top and place in a moderately warm area of the kitchen. I keep mine beside the refrigerator.
Two or three times today (Day 1) swirl the raisins around to loosen them. Each time taking off the lid and replacing to allow some fresh air in.
Repeat this swirling and refreshing and visiting of these little ‘yeast seedlings’ called raisins for the next 2-3 days. Each time giving them a swirl, a breather and replace the lid.
 By Day 2 or 3: You should see the water has turned a deep tea color and some of the raisins are floating! YAY! You’re doing it right!
This is not an exact science though, so don’t be dismayed if yours doesn’t look quite like this. It will get there soon.
Keep the raisins in the water for up to 4 days or until most of the raisins are re-hydrated and floating. They will resemble brown mini-grapes.
Now you’re ready to move to the next phase!
Before doing this next step – take the lid off of this concoction and take a good sniff. 🙂 There should be a slight fermented scent if not a strong one. If you don’t smell it AND if most of the raisins are not floating – you will need to start over. This time leaving the lid off of the jar (replacing with a napkin or coffee filter) for part of the day each day to allow more airborne yeast to make it’s way into the mix. Put these raisins (that didn’t work) in some oatmeal or something.
Now. The next phase of cultivating your wild yeast.
Strain the liquid out into a new clean jar that is capable of holding a quart. Re-purpose the raisins in another recipe. Don’t be tempted to use them again for cultivating yeast; they won’t work as well the second time. I know. I tried. :/
Another 2-3 days of waiting, watching, swirling, lid-lifting and sniffing are ahead. Yes, you read that right. But the good news is – when you begin to see bubbles that stay on the top (they’re there when you wake in the morning) then it’s time to use the liquid gold wild yeast! FINALLY! Right?
Note – Be prepared to begin baking this bread in the next 12-24 hours before you select the time to start this next phase. You have another day or so that the liquid yeast can wait.
Thoroughly mix 1 Cup of Hard White Wheat Flour (that you’ve freshly milled in your Wondermill ) into the jar of liquid gold wild yeast, cover with a napkin or coffee filter and…. yes, wait. Wait between 12-24 hours for the mixture in the jar to make a sponge as the yeast begins to consume the flour making wonderful bubbles! 
Ready? Set? Let’s make this bread already!
Ingredients:
- Your bubbly mixture of wild yeast and flour
- 1 Tablespoon Olive Oil
- 1/4 Cup Organic Sugar
- 2 ½ Cups of Freshly Milled HARD (red or white) Flour
- ¼ Cup Gluten
- ½ teaspoon Sea Salt
For Bread Machine: Put ingredients in in order given and set to ‘Dough Setting’ and be just a little more patient. After which jump down to the double asterisks below. **
By Hand or with the WonderMix Deluxe: Mix the wild yeast and flour mixture, oil, sugar together in your mixing bowl. In a separate bowl, mix all your dry ingredients (flour, gluten, and salt).
Slowly add dry to the liquid stirring until too hard to use a spoon, then start the hand kneading process (or if in the WonderMix Deluxe – start with the dough hook and just keep it going!)
Knead (by hand or by hook) minimum 10 minutes (remember this yeast is a little more dormant and the water is not as warm as usual) – up to 15 minutes – until dough feels elastic and looks somewhat satin.
Cover bowl with a clean cloth towel.
Let dough rise once in the bowl in semi warm place (approximately 85 degrees) approximately 30 minutes or until double the size it started.
LIGHTLY punch it down to get all the air out after it rose the first time.
**All above steps are usually done on ‘Dough Setting’ of your bread machine.
Turn out onto an OILED (not floured – it makes it heavy and dense) surface.
Shape as a loaf or other bread item you would make (buns, rolls, etc) and let rise in the baking pan until it has doubled in size. Remember, this will take a bit longer – the loaf is not warm and the yeast is wild…so be patient but don’t wait too long or it will collapse! Watch the size to double!
During the last few minutes of rising, just before doubling, preheat oven to 375 degrees.
Place loaf in center of 375 degree oven and AS you shut the door – lower the heat to 350! This little extra punch of heat at the beginning will help the loaf to peak.
Bake 18-22 minutes on 350 or until the loaf taps like it’s hollow.
Cool on wire rack and store in airtight bag.
Wait at least 10 minutes before attempting to slice.
Use a serrated knife for best results in cutting.
ENJOY and never worry about running out of yeast again!
Best Blessings,
Donna Miller
Special End Note – Wild yeast can be cultivated with almost any dried fruit but raisins tend to work the best and lend the most consistent results. Play with your food and find out what works for you.
For free whole grain recipes emailed to you each month, please consider signing up for my Newsletter Here

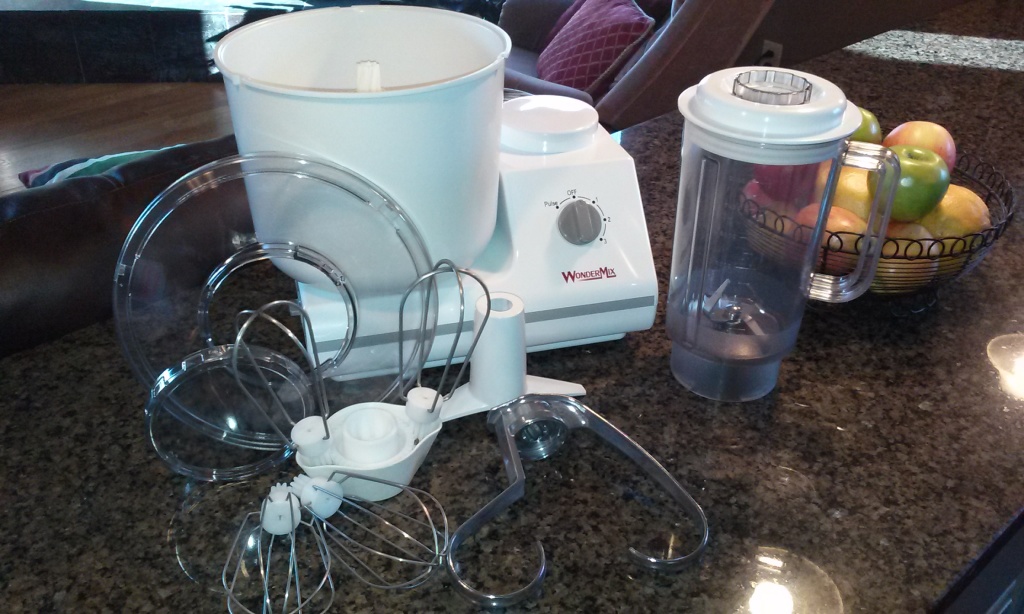
Here is the synopsis of my initial product review of the WonderMix Deluxe. Today felt like Christmas and my birthday wrapped into one as I unpacked the WonderMix Deluxe on my counter to ‘play’ with it.
When it arrived it was packed as a box within a box – very sturdy and all the form fitting cardboard one could ask for to hold things steady!
 Ok so this box was inside an even sturdier cardboard box but what fun is it to see that plain thing. 🙂
Now I’m not going to get into all the features of this yet (that will come in some YouTube Videos and other reviews – besides you can read the list of features here.) But I am going to go into my take on the quality and functionality at first glance and set up. So…
 As I took out each component and inspected it for quality and durability I was struck how ‘natural’ the components all seemed to fit together. What I mean is, most of it made perfect sense even BEFORE I looked at the user manual (which I do suggest because of the great tips and recipes). It just ‘flows’ naturally together; how it all fits together will make sense to you.
 The special introductory price of this actually is lower than the Bosch Universal, Electrolux or KitchenAid Professional (like almost half the price – yeah, I’m not kidding) but in my opinion, the quality is absolutely just as good if not better than those multi-use mixers. Even the regular price of the WonderMix Deluxe beats the prices of the other mixers that have far less versatility.
Let’s look at the parts that come with the WonderMix Deluxe, shall we?
Yes…let’s …do that. (:
First the bowl and lid. The bowl is sturdy, yet also slightly flexible, can mix up to 5 1/2 quarts (22 cups) of mixture! That’s about 5 loaves of bread being kneaded at once!
 The lid has both a splash guard and an easy smaller flour guide to put in items such as nuts, raisins or more ingredients as it mixes without risking a ‘spill’ or having to stop the machine
 Most important to me is how sturdy is the Dough Hook for kneading. This one is heavy duty and sure not to disappoint as compared to some. Even the design makes sense how the sides differ from each other for real-life kneading. Also included is a small item called the Divider which helps make sure the batch of dough does not simply spin in circles around the driver as it mixes. What an ingenious do-dad!
 The Whip and Housing fit together like clock work. No seriously, like clocks work… deep tines and teeth so as not to be stripped when mixing with that powerful 900 watt motor (the most powerful on the market). In fact, all the notches and gears on the WonderMix are deep and sturdy. I find that to be the mark of a truly well made machine.
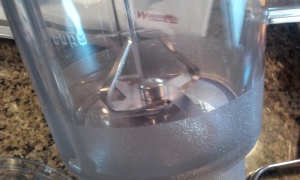 The blender has a sturdy body, a funnel lid (smaller hole for pouring) and a very tight seal. The tines in the base of the blender do not need to be removed for cleaning – meaning the whole thing is very very leak proof! Also the tines are not wimpy low-to-the-base ones, but seriously make an impact upon the food (or ice snow) you’re blending up!
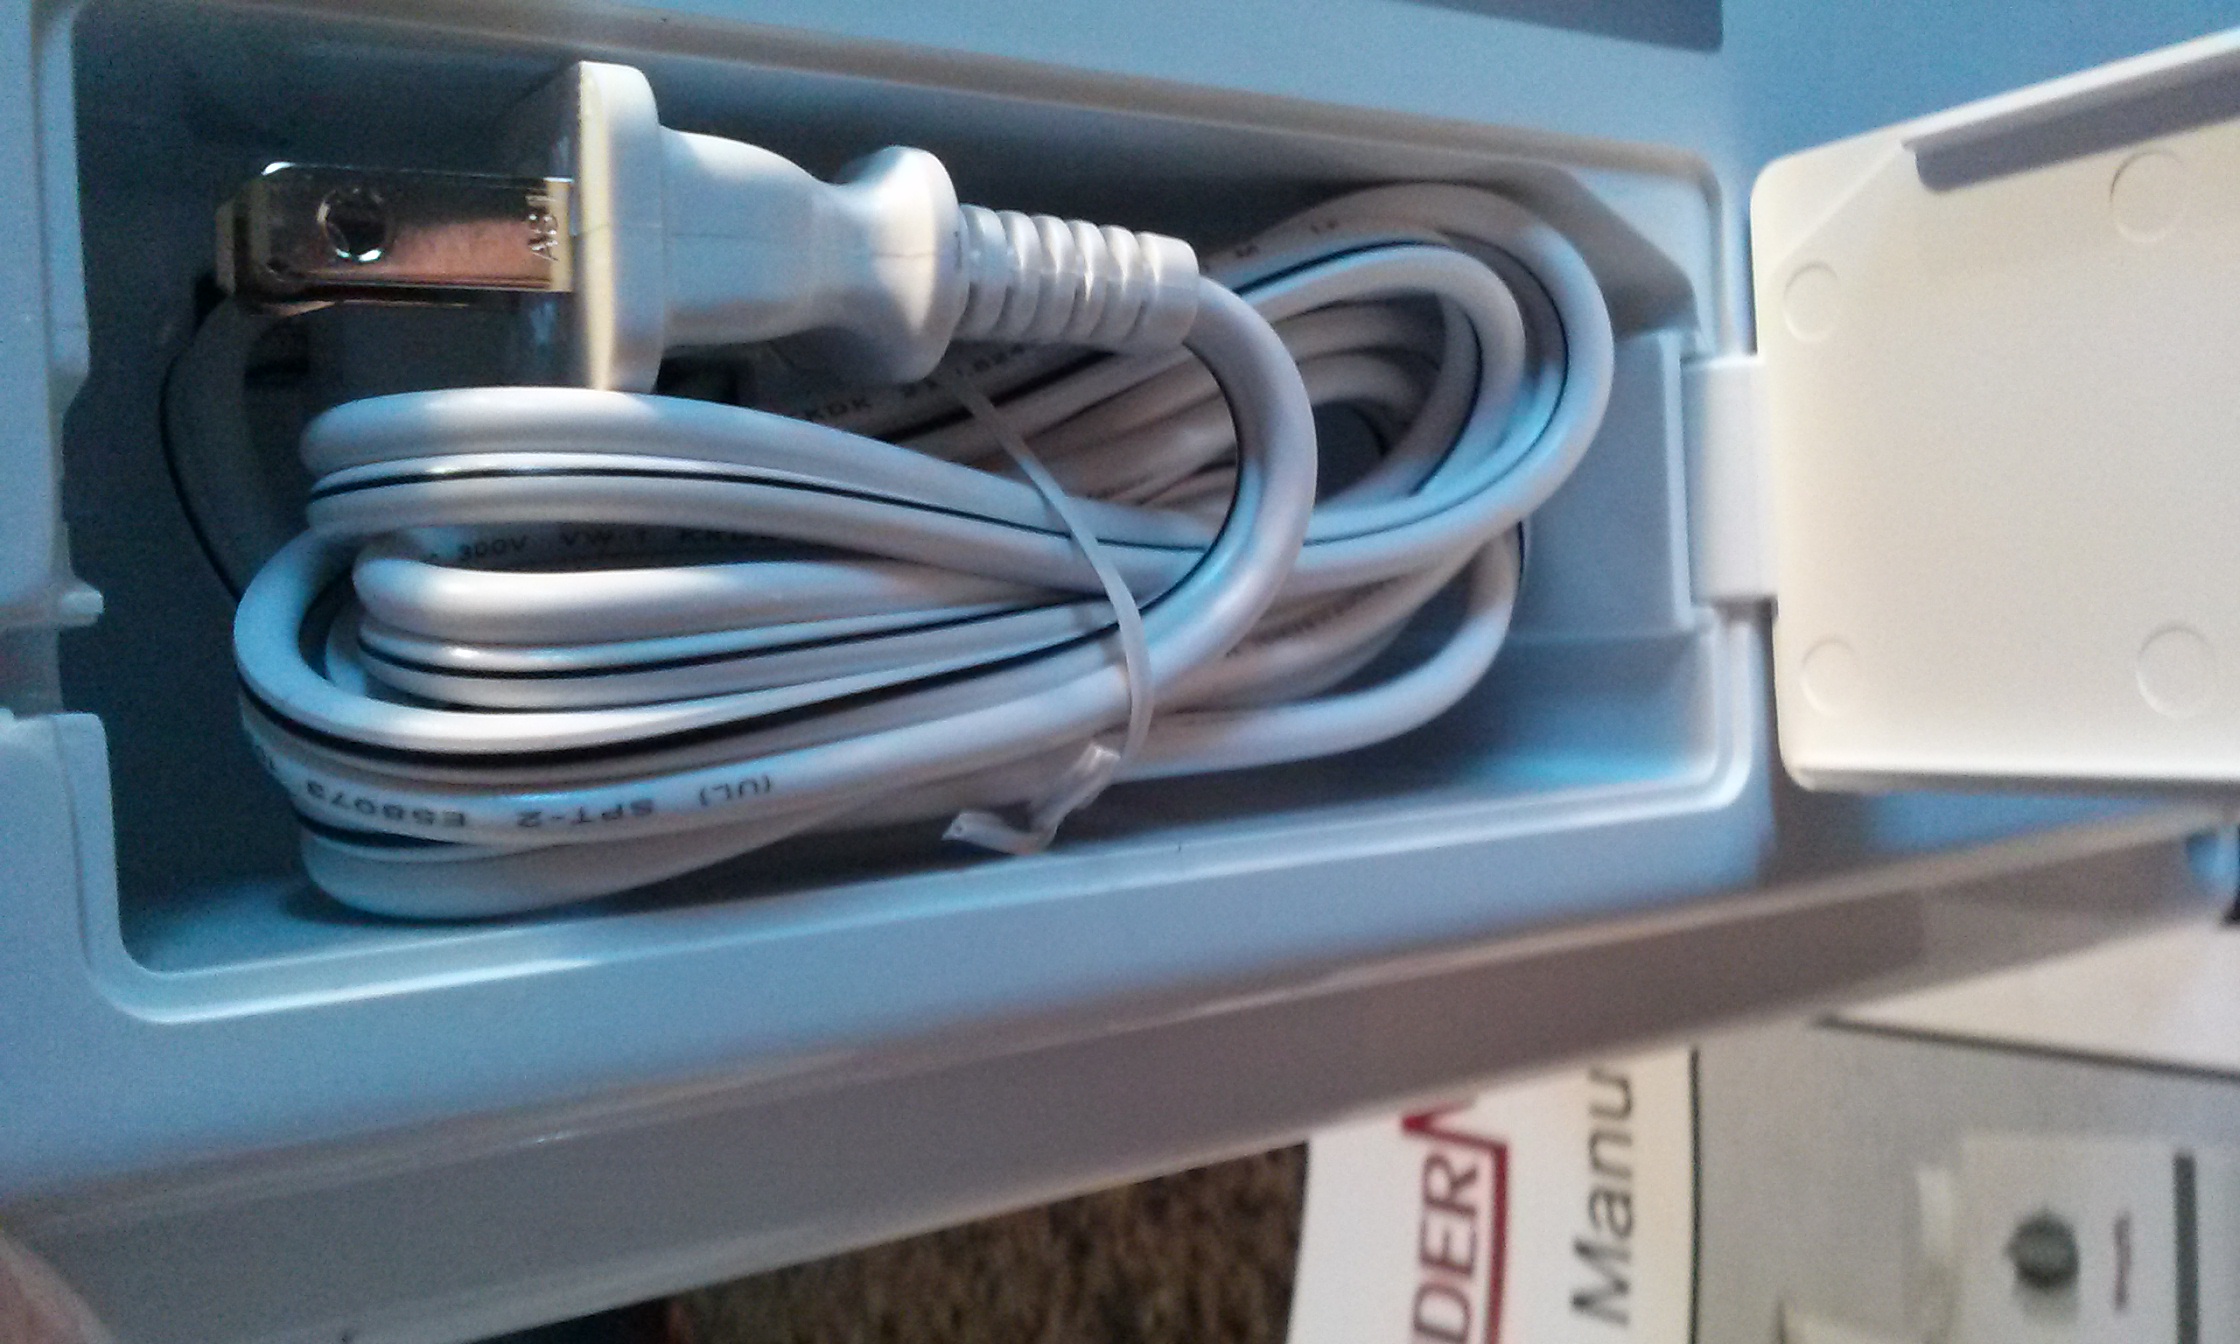
The fine folks at The WonderMill Company have even take into account some exterior features such as the storage for the cord and the ‘no walk’ feet on the base. These no walk feet are also on the side for when using other optional attachments that fit the WonderMix such as the Meat Grinder, Slicer Shredder and more.
In conclusion of today’s unpacking, inspecting event and review… it’s safe to say I can’t wait to play with this tomorrow!! If you want to see reviews in action, subscribe to my YouTube Channel and you should see some soon!
I’d like to thank the folks at The WonderMill Company for giving me the opportunity to review this fantastic machine. Years ago, when they first released the WonderMill Jr. Deluxe they blessed me with the opportunity to review it and share feedback as well. This is one company that I can fully stand behind stating that they really strive to meet and exceed the needs of the public. So again, I am humbled and honored with the opportunity to play with… I mean, review this fantastic new WonderMix Deluxe.
Look for more updates and reviews about the WonderMix Deluxe as I enjoy my holiday baking more than EVER this year! 🙂
Best Blessings,
Donna Miller
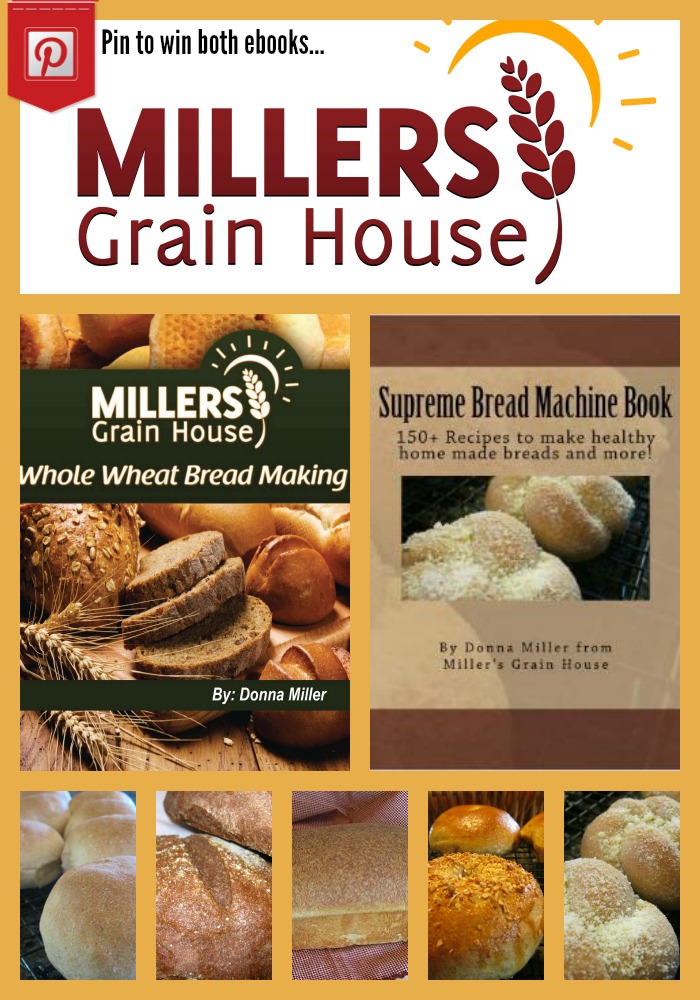 Two Bread Making e-Books are just the beginning, this giveaway is the kick-off to begin online classes! So your feedback in the form below is very important. But, why not give you a chance to WIN for sharing your input, right? I think that’s only fair. 🙂
Book #1 is my Whole Wheat Bread Making Book – which is a step by step tutorial with all the tips, tricks and techniques for a successful loaf of tasty, whole wheat bread that your whole family will enjoy (even the ones who used to snub whole wheat)!
Book #2 goes beyond! The “Supreme Bread Machine” now takes you on a taste-bud journey where you can use the techniques you learn in the other book. It opens up 155+ varieties of bread from savory to sweet from batter to yeast loaves. And there are great tips on storage and troubleshooting. As a BONUS , you’ll also receive a link to my Bagel Making Video – which will help you turn most all of these recipes into Bagels too!
Enter with these quick, easy steps for your opportunities to win these two easy to follow e-Books.
Don’t forget – you can come back and “Tweet” this giveaway each day to increase your opportunity!
Also – if you want to be notified of more giveaways, perks and the upcoming online classes (well, you can see what all you get over there), be sure you subscribe to our newsletter —->
Happy Entering and enJOY the Journey!
Donna Miller
Between the cost of a chain coffee shop frappe, the crud that is allowed to be put in one at any and all coffee shops, and the calories (a small size frappe has a range of 450-700 calories) found with a fast food frappe – it’s no surprise that the Food Holiday of “National Frappe Day” (Oct 7) may just pass you by. Then again, for 4 out of 5 people a frappe is almost an addictive indulgence and October 7 is just like every other day of the year!
If you enjoy these, let me share some things with you to save both your money and your health on this holiday or any day of the year that the frappe craving may hit.
 On average most commercial frappe’s you purchase will contain one or more of the following very unhealthy ingredients:
Uhm… ewww.
Here’s how you can avoid all of the above chemicals and artificial ingredients and enjoy a Frappe the Healthy Way! By the way – on a side note: Don’t be duped into thinking that those ‘coffee syrups’ are a singular or healthy ingredient option. They are neither.
First – select your coffee. This is very easy if you’re a morning coffee drinker (decaf or fully leaded – both work fine) simply make a few cups more and let it cool. When cooled you can either freeze in ice cubes (for a frozen frappe) or pour in a jar and refrigerate (for a frappe on ice).
Frappe on Ice:
8 oz of Cold Coffee 3TBS Fat Free Cream or Skim Milk (Almond or Coconut Milk works too) 1 tsp Pure Extract (Vanilla, Hazelnut, Peppermint, etc – endless options!) 1-2 dashes* of Spice (Pumpkin Pie, Nutmeg, Cinnamon, etc – endless options!) * For a Mocha use 2tsp of Cocoa Powder as the spice. Sweeten to taste with stevia or natural cane sugar Blend all ingredients together until well mixed and pour over ice cubes. Top with REAL Whipped Cream if desired add a straw and sit back and enjoy!Frozen Frappe:
2 Cups of Frozen Coffee Cubes 3TBS Fat Free Cream or Skim Milk (Almond or Coconut Milk works too) 1 tsp Pure Extract (Vanilla, Hazelnut, Peppermint, etc – endless options!) 1-2 dashes* of Spice (Pumpkin Pie, Nutmeg, Cinnamon, etc – endless options!) * For a Mocha use 2tsp of Cocoa Powder as the spice. Sweeten to taste with stevia or natural cane sugar Blend all ingredients together in a blender (may need to add 2-3 TBS of water to thin) until a frosty mixture is combined to the right consistency. Pour in a tall glass. Top with REAL Whipped Cream if desired add a straw and sit back and enjoy!
These may seem simplistic – but the pay out of enjoying real food at a real reasonable price can help you enjoy a little indulgence without feeling the guilt of it all later! After all, playing with your food helps you to enJOY the journey!
Happy National Frappe (the Healthy Way) Day! Best Blessings, Donna Miller of Millers Grain House
 I am often asked the questions: “What’s the best mill for me?” and “How do I store grains?” These are great questions and the answers differ depending upon your needs and your storage space. I have a two free things to share with you to help you answer those questions.
First – as much as I wish I could come to every town, visit each home and spend time teaching all over the place – until time travel or teleportation is invented – there are only so many hours in a day and miles one can make to do what I’d love. So, in light of that – I’d like to invite you to sign up by clicking here for ->THESE FREE ONLINE SEMINARS.<- You may or may not be interested in all of the ones offered – but I hope you’ll come to the ones that do interest you and – especially the one I’m hosting on July 17th (Thursday at 9PM Eastern)on the topic of Home-milling & Grain/Dry Goods Bulk Storage.
Here’s what you’ll learn:
- Why store whole grains vs. flours or meal?
- Why would I mill now…doesn’t it take a long time?
- What’s the best mill for my needs?
- Three top rules for grain & dry goods storage.
- Mylar, Gamma, CO2 Packs, oh my! Let’s make it easier.
It’ll be FUN! Like we’re in a class together. I’ll be there LIVE and able to take your questions at the end and help you personally. But you’ll need to -> sign up for the whole thing early enough <- so you can get in on that date.
Second – in order to help you with more detailed information to answer the questions: “What’s the best mill & how do I store grains?” I’d like to offer you this FREE Grain Mill Comparison Chart. If you’re a detailed person when it comes to making decisions and gathering information, this chart has it all in spades! Compare speeds, sound, quality and more with a quick glance across the lines. The grain mills on the chart range from manual to electric and ones that can be both! So no matter which ones may interest you – you can make comparisons!
Don’t forget that we are always available to help you by email and phone too! So feel free to contact our office via email or call 828.536.4988 during business hours. Mon – Thurs 9:00-5:00, Fri 9:00-4:00 Eastern Time (Closed Sat & Sun)
We would be honored to help in any way possible. Plus, we may have some savings for you too when you contact us!

Partially due to my Native heritage and partially due to the fact that June 27 is National Indian Pudding Day, I just had to dive in to making this today and wanted to share it with you.
This was a great new taste! I thoroughly enjoyed it and it was so easy! I will admit though, that being a warm pudding and using these particular flavors, I will be adding this dessert to our Thanksgiving menu. I’m not sure why the National Food Holiday for this one falls in June anyway? I’d be glad to hear from you if you know…so please feel free to leave a comment below.
Hope you enjoy!
For daily updates of what food holidays there are (every single day of the year) please visit and ‘like’ my Facebook Page.

Ingredients
- 3.5 c. milk (or use almond or coconut milk for dairy free option)
- 1/2 c. freshly milled cornmeal
- 1/2 tsp. salt
- 3 eggs
- 1/4 c. light brown sugar (or succanant)
- 1/3 c. molasses
- 2 tbsp. butter (or use coconut oil to make dairy free)
- 1/2 tsp. cinnamon
- 1/8 tsp. allspice
- 1/6 tsp. ginger
- 1 tsp vanilla extract
- 2/3 cup chopped dates or chopped raisins
- After assembling all ingredients and before starting the actual mixing lightly grease crock-pot. We like to use coconut oil for this.
- Preheat it empty on high for 20 minutes while you’re doing the next steps.
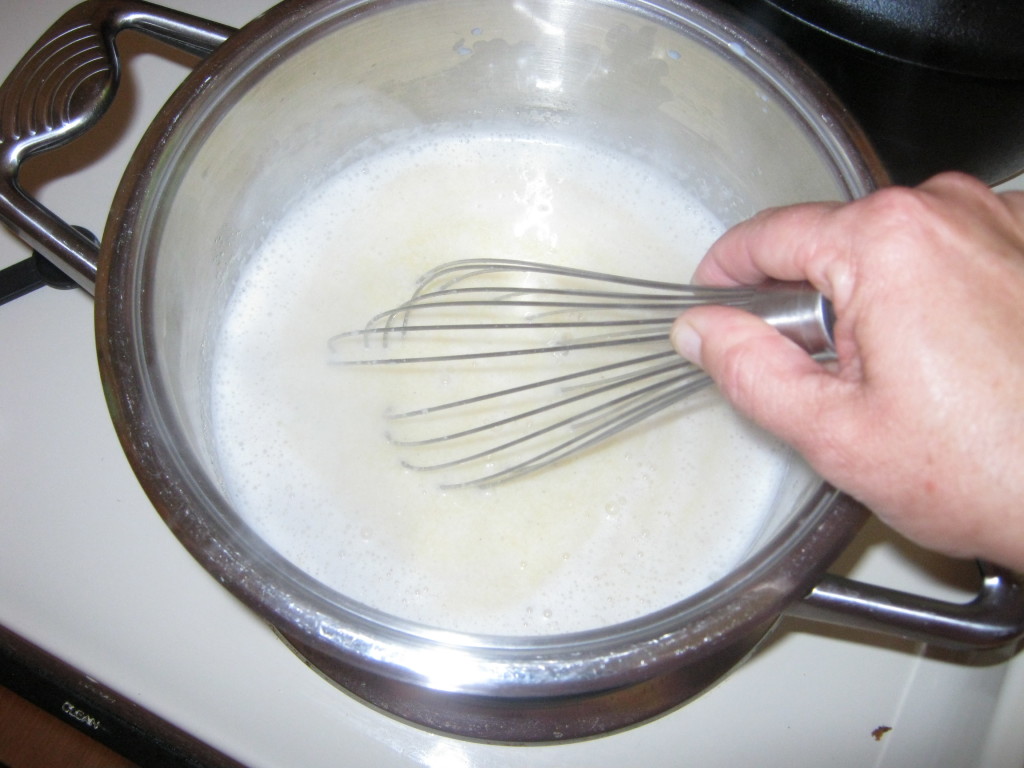
- Meanwhile bring milk or nut-milk, cornmeal and salt to a low boil. Boil, stirring constantly, for 5 minutes.
- Cover and simmer on very low an additional 10 minutes stirring occasionally to make sure it doesn’t stick. The mixture will become thick.
- In a large bowl, combine eggs, brown sugar, molasses, vanilla, butter or coconut oil, and spices. Mix all together until well blended.
- Temper this mixture by spooning in and well incorporating about 1/4 cup of the hot cornmeal. Do this step twice to increase the temperature of the egg/spice mixture.
- Now gradually beat the tempered egg/spice mixture into hot cornmeal mixture; whisk until smooth.
- Stir in raisins or finely chopped dates. Pour into your pre-heated/oiled crock and cook on high for 2 to 3 hours or low* for 6 to 8 hours.
Other tips and topics to this recipe:
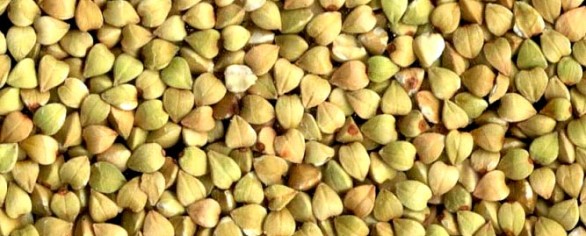
 Grind the corn (popping corn works too) on the coarse setting in the Wondermill.
 Be sure to stir continually because dairy and nut milks will stick and are easily scorched at the bottom of the pan.
 Pudding will produce a skin on the top, but it works into the pudding just fine with no affect of the texture.
If you try this and/or tweak this recipe for Indian Puddling – I’d sure love to hear how it came out for you! Please share in the comments below.
Thank you and Best Blessings,
Donna
* See this blog post if you have issues with your low setting on your crock pot being still too high. http://www.millersgrainhouse.com/blog/how-to-fix-a-crock-pot-that-gets-too-hot/

A Compost Starter is such a useful tool for your garden, which leads to healthier eating and a better managed grocery budget. How much better would it be if you could get a compost Starter for FREE? Well, that’s what we hope to offer one person with this Giveaway!
Would you, or someone you know, love to win an Green Cycler – Kitchen Compost Starter, Bin & Shredder, Black?
This is your chance because we’re giving one away!


This Giveaway runs from June 23, 2014 12:00AM EST to June 29, 2014 11:59PM EST. Must be 18 years or older to be eligible.
No purchase necessary. The winner will be randomly selected.
Our Friends at “The Dollar Stretcher” have reviewed this item and are happy to share their findings with everyone.
Read more about it HERE

 “Light bulb” moments and “happy accidents” are my favorite things. (: Let me share one with you… and it comes in the form of a recipe.
One night I made double my regular Whole Wheat Pizza Crust as if I were feeding the whole army of Millers (don’t know what got into me, I guess I was waxing nostalgic thinking I had little kids at home…but I digress)… then I realized that only two of us were going to eat that night and we had a road trip the next day!
Typically I would make the extra pizza crust and freeze it (in a turkey basting bag – because they’re huge)…but this time I thought I should make some snacks for the road from the crust. And boy did these Whole Wheat Bread-sticks with a Twist hit the spot! Portable and filling!
So I share this happy accident with you!
Hope you enJOY, get creative and keep playing with your food!
Best Blessings,
Donna Miller of Millers Grain House
_____________________________
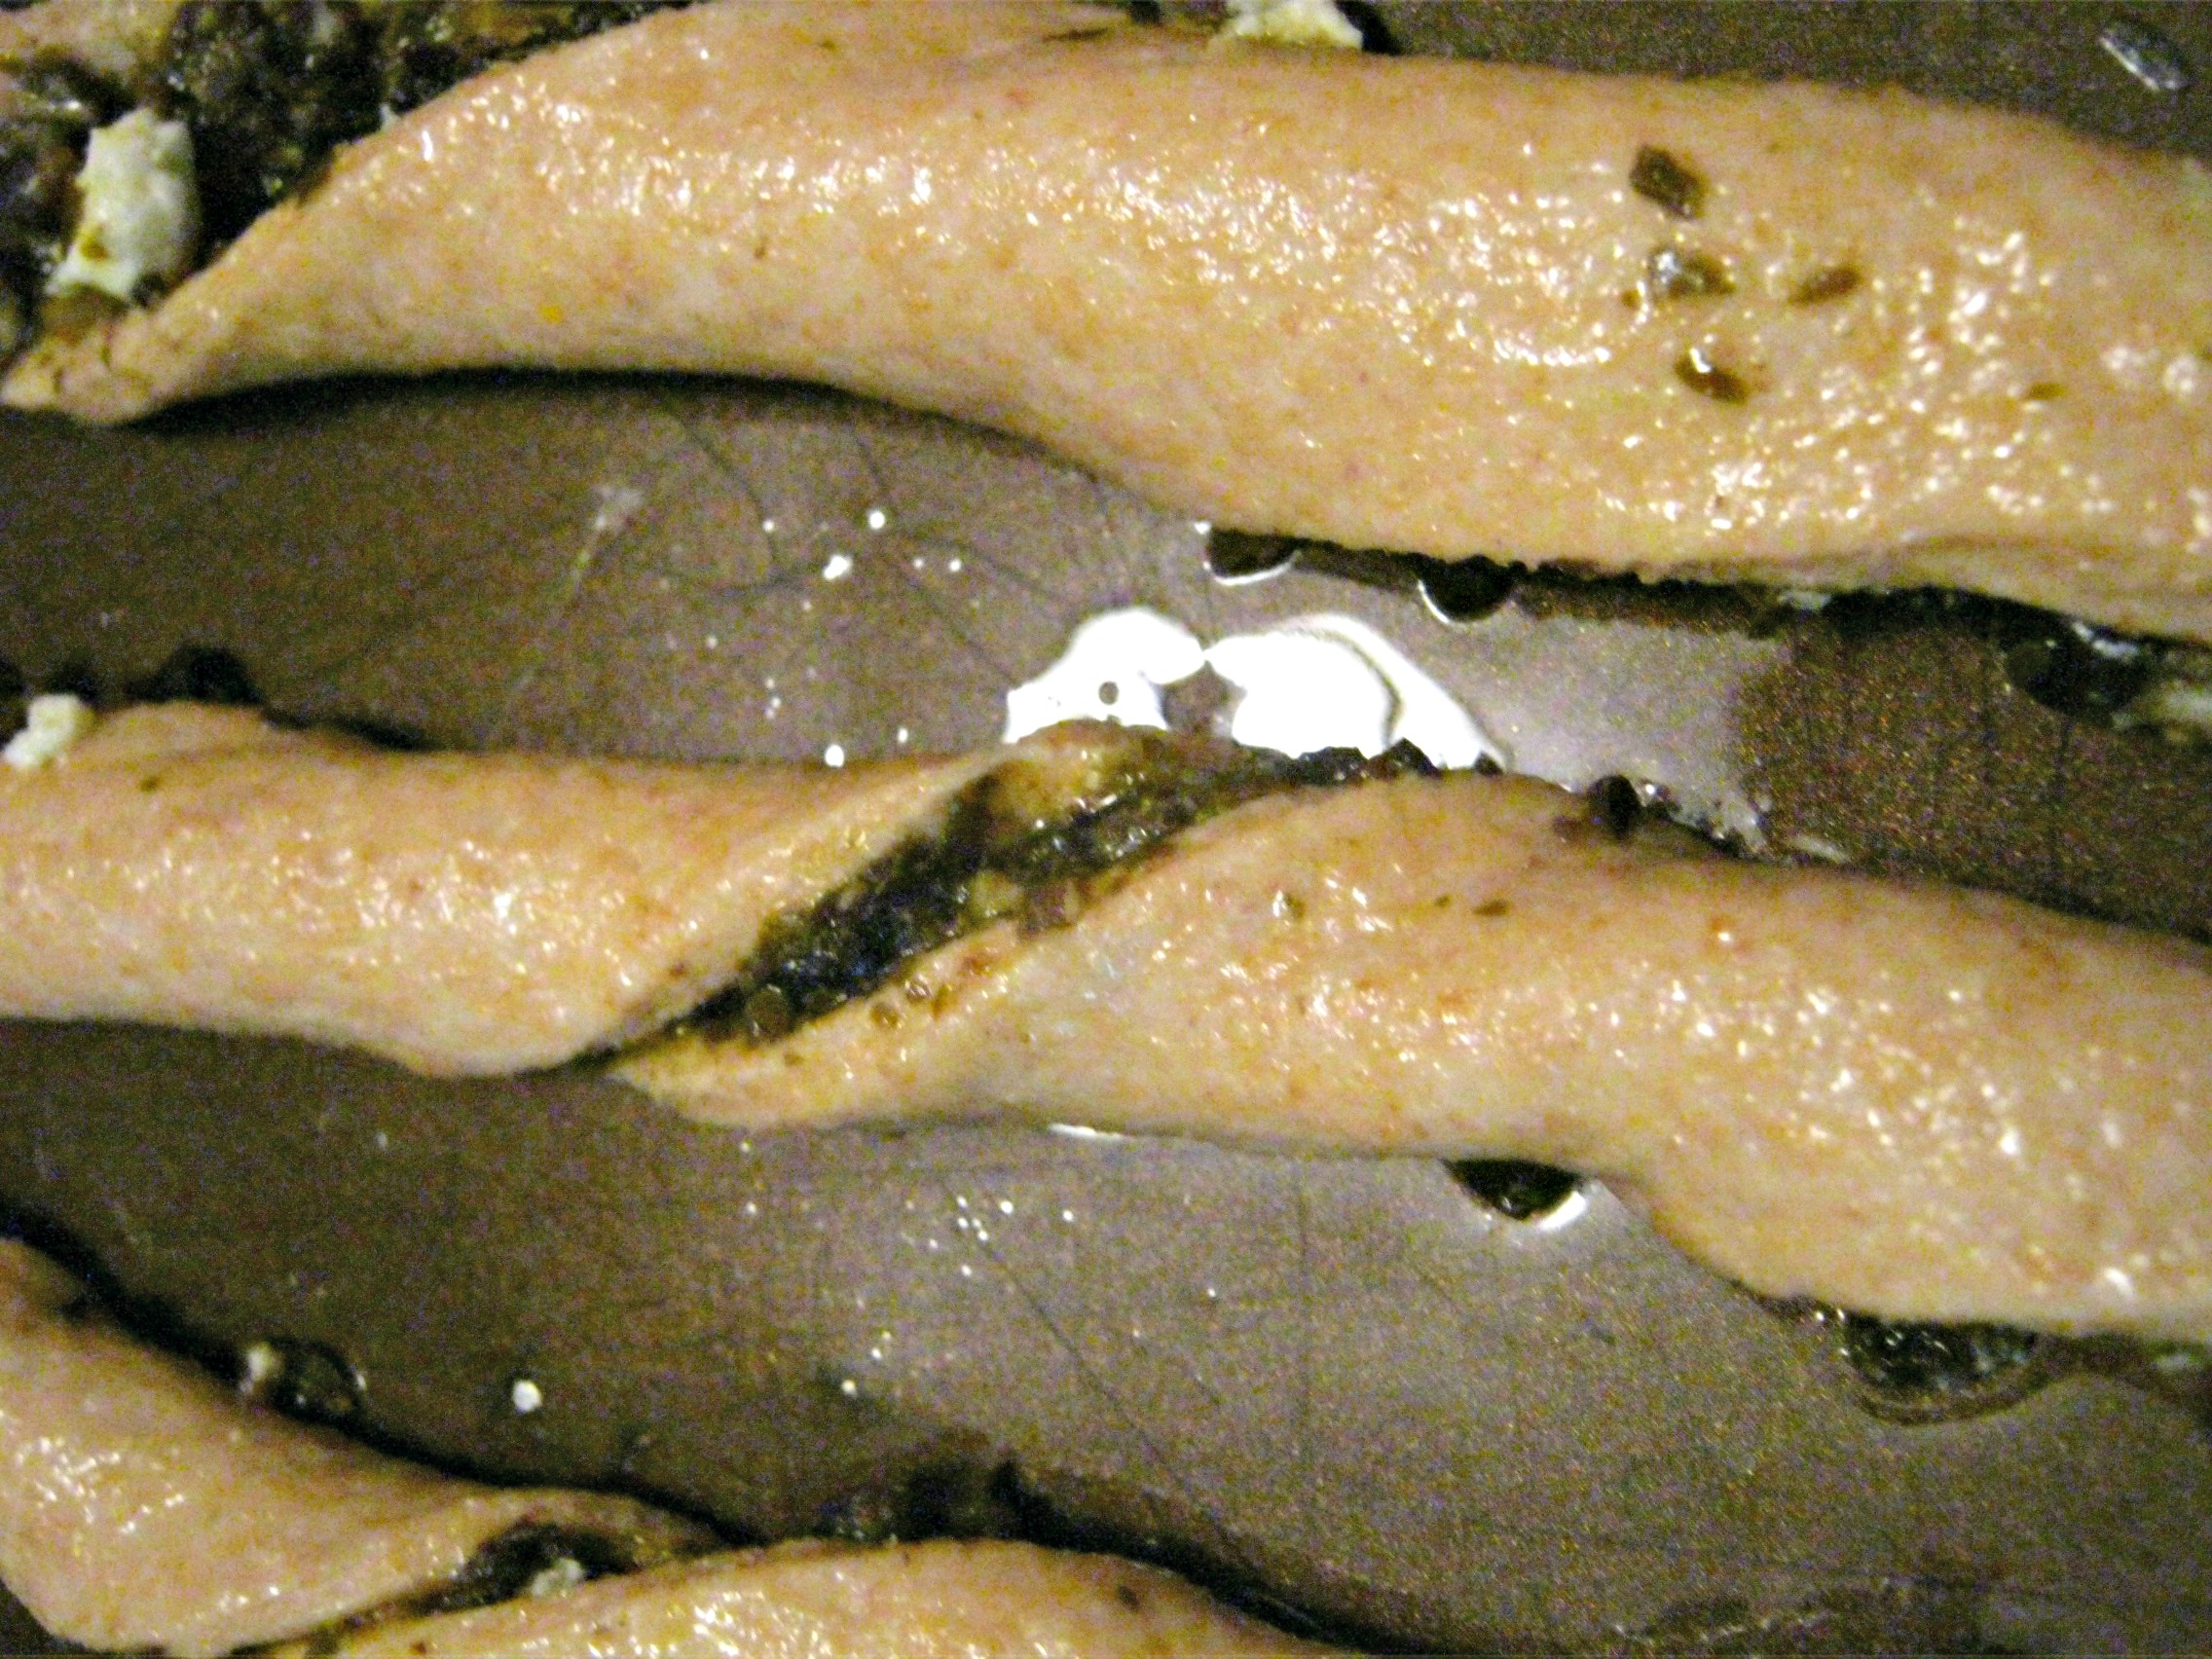
After making the pizza crust. Roll out dough in a rectangular(ish) shape and begin the creative process. To avoid too ‘gooey’ of a bread stick you won’t want to use much sauce or liquid toppings, but as the example below shows we made one half has Parmesan, mozzarella, peperoni and oregano. The other half has pesto, olives, feta and some dried onion flakes. 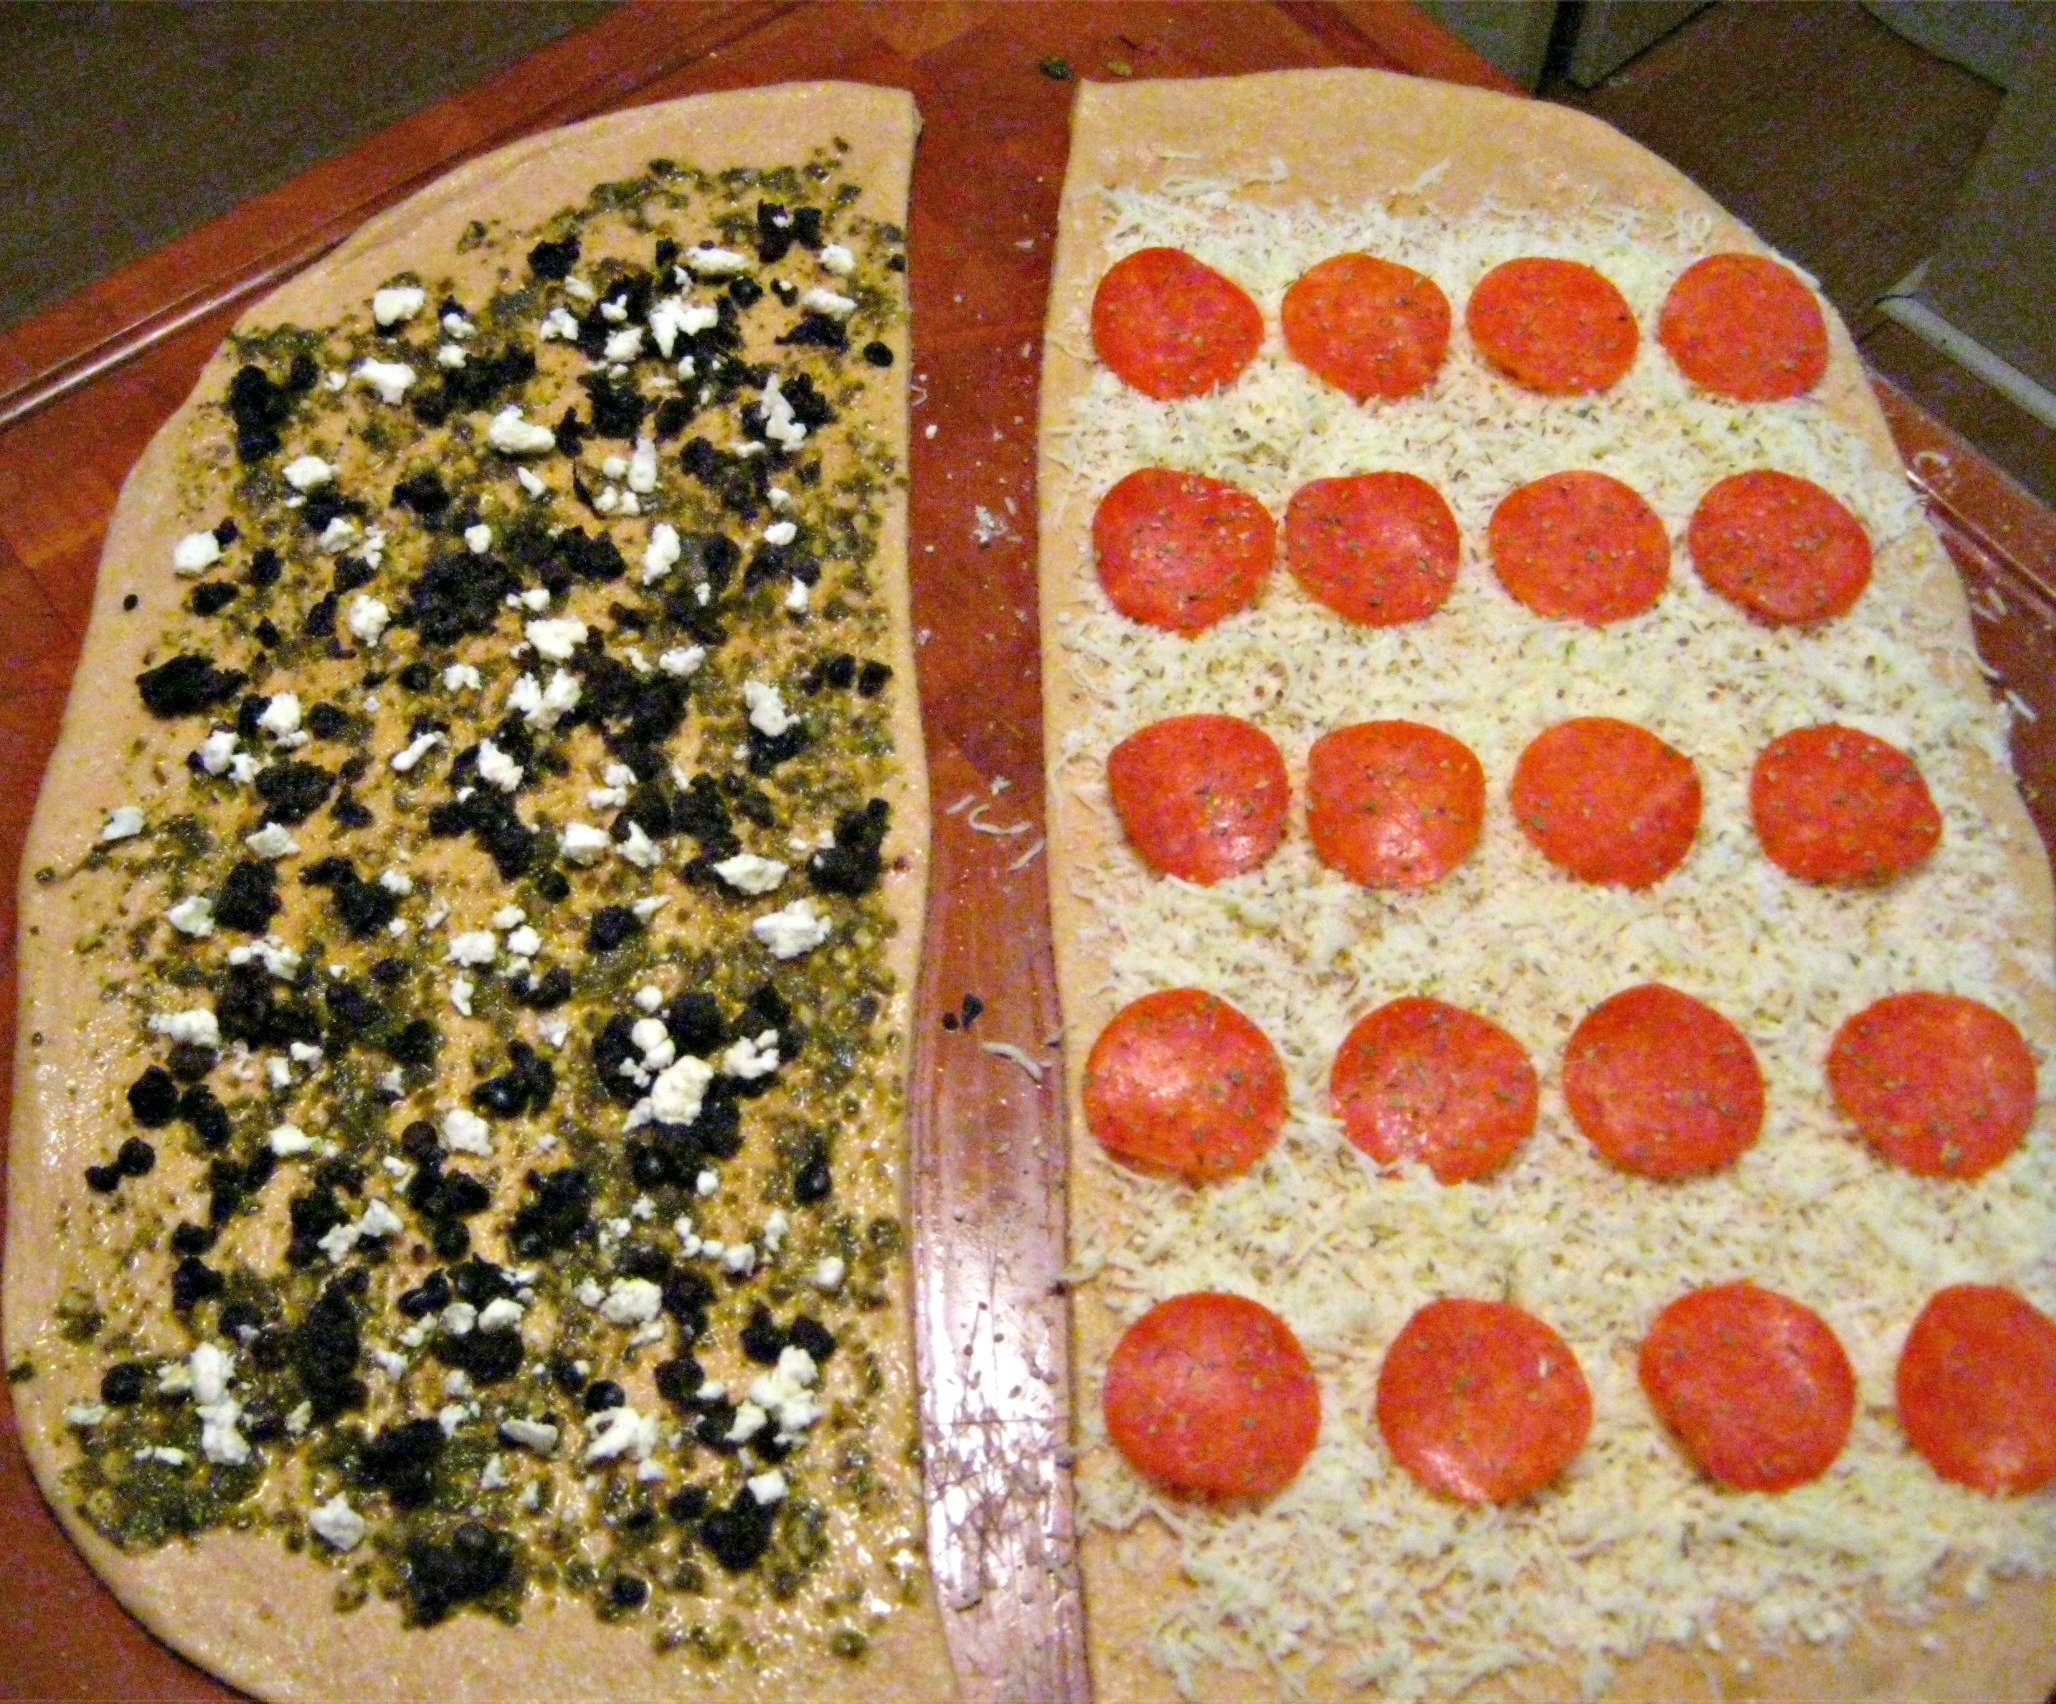
Then we used the pizza cutter to cut into strips.

After we cut the strips (and made garlic knots out of the ends that were missed with the toppings), we folded the good stuff inside, lengthwise and then gave each bread-stick dough a little twist while putting it on the cookie sheet. See the pesto, olive bread- stick below:
Bake these Whole Wheat Bread-sticks with a Twist on cookie sheets at 350 degrees F. For about 15-18 minutes and cooled on a wire rack before bagging.
These are great served warm (of course we had to taste test them!) or once completely cooled can pack in a baggie for an easy take-along snack.
_____________________________
Please visit Millers Grain House for your kitchen needs.
When you create a new customer account, you receive a coupon code to save on your first purchase!
FOR A SELF-SUSTAINING LIFE


