
![]()
Parmesan-Herb Bread
2lb Loaf Recipe
Ingredients:
- 1 ¼ Cup Warm Water (100-110 degrees)
- 1 Tablespoon Oil (Olive, Canola, Safflower or Sunflower)
- ¼ Cup Sweet Stuff (Sugar, Honey or Sucanant)
- 1 Medium Egg
- 3 ½ Cups of Flour (this can be any combination of Whole Wheat and White Bread Flour – best for newbies to start out with 1 ½ Cups White & 2 Cups Whole Wheat)
- 1/4 C Grated Parmesan Cheese
- 1 TBS Oregano
- 1 tsp Onion Salt
- 1 tsp Garlic Salt
- ¼ Cup Gluten
- 1 ½ teaspoon Fleishmann’s Instant Yeast
- Another Egg & 1 TBS cold Water for Egg Wash
- Another 1/4 C Grated Parmesan Cheese
For Bread Machine: Put ingredients in in order given and set to
‘Dough Setting’ – now go fold clothes, vacuum and clean the shower
(o:
By Hand or with Mixer/Dough Hook : Mix all the water, oil, egg and sweet stuff together in your mixing bowl. Proof your yeast in the whole liquid if you want to. Instant yeast does not HAVE to be proofed (let get bubbly) but it won’t hurt it if you do. In a separate
bowl, mix all your dry ingredients (flours, gluten, salt and yeast
if you didn’t proof it).
Slowly add each of the dry ingredients to the liquid stirring until too hard to use a spoon, then start the hand kneading process (or if in the kitchen aid – start the dough hooks, or if in the Bosch Mixer…follow directions for kneading).
Knead (by hand, by hook or by Bosch ) minimum 10 minutes – up to 15 minutes – until dough feels elastic and looks silky-like (or in
Bosch Mixer – it pulls away from the sides).
Cover bowl with a clean cloth towel.
Let dough rise once in the bowl in semi warm place approximately 30 minutes or until double the size it started.
LIGHTLY punch it down to get all the air out after it rose the
first time.
(All above steps are usually done on ‘Dough Setting’ of your bread machine)
Turn out onto AN OILED (not floured – it makes it heavy and dense)
surface to REST for 5 minutes (this helps the gluten that has
formed to relax a bit and not ‘crack’ the crust).
Now form your loaf by flattening by hand, and rolling up like a
‘jelly roll’ and after tucking ends in and seam side down, place it
into a greased loaf pan.
Beat the 1TBS cold water in with one egg in a small bowl and brush the top of the loaf. Sprinkle with a light dusting of Parmesan Cheese.
Cover the pan with a clean towel and let rise in a semi-warm place
another 30 minutes.
Last 10 minutes of rising, preheat oven to 350 degrees (be sure
your racks are placed so that loaves bake in the middle of the
oven).
Bake 18-22 minutes in center of the oven. Start checking for
golden tops and ‘hollow’ sound when top is tapped at about 18
minutes.
Take out of pans and cool on a wire rack.
Wait at least 10 minutes before attempting to cut – or it smooshes!
If you can wait that long after smelling it bake! Use a serrated
knife for best results in cutting.
Use a good olive oil and balsamic vinegar for dipping!
Other shapes/uses:
This same recipe can be many smaller shapes. Simply shape differently and bake approximately 15 minutes on 350.
Cloverleaf Rolls – about 12 – divide into 12 equal weight balls of dough. Then separate each each ball into three equal balls. Place all three in the base of a greased muffin tin. Fill each muffin tin with the 3 small dough balls made from the 12 larger dough balls. Brush with egg wash and top with the Parmesan Cheese. They will rise and and fill the muffin tin cup in about 30 minutes. Bake 15 minutes on 350. Cool on wire rack and store in airtight bag.
Herb Sticks – about 12 – divide into 12 equal weight balls of dough. Roll like a thick play-doh snake and place on a baking sheet not touching. Brush with egg wash and top with the Parmesan Cheese. They will rise and touch in about 30 minutes. Bake 15 minutes on 350. Cool on wire rack and store in airtight bag.
Dinner Rolls – about 24 – divide into 24 equal weight balls of dough. Make a ‘domino’ sized oblong dough ball with creases on the bottom and place in a casserole dish not quite touching. Brush with egg wash and top with the Parmesan Cheese. They will rise and touch in about 30 minutes. Bake 15 minutes on 350. Cool on wire rack and store in airtight bag. These will pull apart easily.
For step by step pictures and instructions of my FAVORITE way to shape and serve this recipe (Rosettes pictured below) be sure to see the instructions below.
 |
Shaping the Rossettes
Divide dough into 6-8 equal weighted balls of dough. Then take one and form a ‘snake’ about 1 to 1.5 inches in diameter.
|
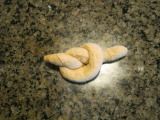 |
Then tie a ‘knot’ in the center of the ‘snake. It should look something like this.
|
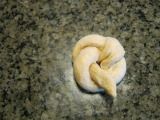 |
Then bring the longer end over the top of the dough knot tucking it into the center hole of the knot.
|
 |
Then bring tuck the remaining shorter end (see above) under the knot and pinch slightly into other dough to hold. This one has been transferred to the cookie sheet already.
|
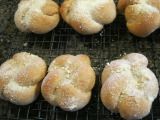 |
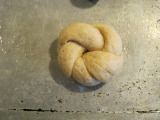
The finished product dusted with Parmesan and ready to eat!
|
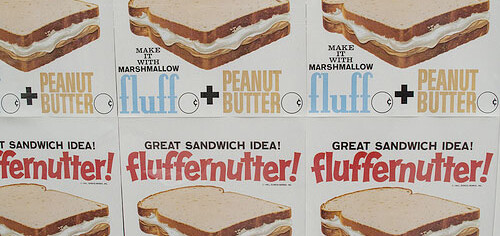
Sure. Maybe you thought that today was only Columbus Day, but nay there is a more pertinent holiday that just begs to compete with the accidental finding of our home land…and that is National Fluffernutter Day.

No. This is not another word from the movie Mary Poppins, but a real iconic sandwich (or variation there of) using peanut butter and marsh mallow fluff.
Although not a healthy food as depicted in the photo to the left, on white bread, it is often associated fondly with the nostalgia of childhood and thus, to me means we can grow it up a bit by making it healthier and still enjoy some of the fun too!
So let’s look at how to do this:
First – please try your hand at making your own PEANUT BUTTER. It’s easy and often less expensive. It also lacks those awful hydrogenated oils of the store bought variety. Also by using some Stevia vs. all Sugar (as the video linked above shows) you cut down on the sugar intake. Of course that ‘s a mute point was we get to the other ingredient… Marshmallow Creme, but oh well.
Marshmallow Creme is what it is. Although the one benefit is that it is a no fat food! So there, feel healthy. (o:
The last needed ingredient for your Grown-Up, Healthified, Fluffernutter Sandwich would be freshly milled 100% whole wheat bread. Here’s the recipe. If it’s made from home with all ingredients you can pronounce it’s much healthier.
Now put that sandwich together (go sparingly on the fillings, remember they do ooze) and just enjoy!
A few other options to enjoy National Fluffernutter Day are:
– Put home-made PB and Fluff on a Rice Cake
– Put home-made PB and Fluff on a Whole Wheat Pancake
– Put home-made PB and Fluff in between crackers.
It’s an odd food holiday…but a fun one we can still enjoy just a little bit if we put on our thinking caps.
We were recently asked this question. We hope that by sharing the anwer with you – we are able to help you as well.
") ————————
————————
Hi guys. Love the info! My storage spot is the garage but Summer gets hot. Am I ruining the grains I’m starting to store?
————————
Answer:
Thank you for contacting us and for your kind remarks! We’re delighted to be of service.
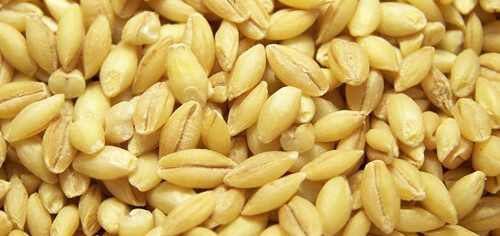
Ruining? Not really. But you may be shortening the life of them.
Grain stays intact and fully nutritious at approx 80degrees at the hottest. Over that temp it begins to decompose/breakdown.
If the wheat germ oil inside gets consistently hot then cool then hot then cool it will make the wheat bitter tasting and thus, not so good when you go to use it. It may also not ‘act’ like regular flour either due to the density of the oil after prolonged heat.
Indoors. In dark or no exterior windows. Dry. Away from any heat source. No hotter than 80 degrees F. Is the optimum way to store grain to last for hundreds of years.
Hopefully this helps answer your question!
—
Joseph & Donna Miller, Owners
Millers Grain House
Thank you for allowing us to serve you. It is our pleasure!
Deut 28:5 – “A blessing upon your grain-basket and kneading-bowl.”
Feel free to contact our office via email or call during business hours.
Mon – Thurs 9:00-5:00, Fri 9:00-4:00 Eastern Time (Closed Sat & Sun)
![]() 1.828.536.4988
1.828.536.4988
Come Visit the NEW Millers Grain House – https://www.millersgrainhouse.
Free Video Encouragement – http://www.youtube.com/
Free Radio Show – Encouragement in the Kitchen – http://www.blogtalkradio.com/
 One of the biggest joys of freshly milled whole wheat at home is experimenting and finding out just what can be made. Having the whole grain on hand, milling it and using it in a variety of ways just opens the doors wide for budget stretching and nutrition!
I used to think that English Muffins were one of the most difficult things to make. I mean, look at them! They are small discs of toasty goodness with the pull apart texture that makes them toast better than any slice of bread. Not to mention, we have always made Egg-Mc-Miller-Muffins for special occasions and I was afraid I’d mess things up by trying to make a Whole Wheat English Muffin. Boy, was I glad to be WRONG!
The May 31st Newsletter will have the full recipe and steps for making your own whole wheat English Muffins. Trust me, if I could do it – you can do it! So be sure you’re signed up for the Newsletter. Also, we’ll be  having a live video class on this – so you can see the techniques and ask questions! We’ll notify you of that class in the newsletter too!
I’ll leave you with my favorite picture from my adventures in Whole Wheat English Muffins!
EnJOY playing with your food! You may never know what you can do until you try!

Home-made Whole Wheat (freshly milled!) Pizza Crust can be made easily ahead of time to make even the most hectic evening meals both fast and healthy. With variety and choices of toppings it can be a great family pleaser! I mean, who doesn’t like to choose their own toppings on pizza, right?
From fresh herbs to your own simply made tomato sauce (ground tomatoes) there are endless possibilities to toss on top of this crust and have dinner in a flash. The secret is making several of these healthy crusts ahead of time and freezing them!
Here’s the simple way to do it.
First use freshly milled whole wheat in your favorite recipe. You can see mine on our VIDEO ARCHIVES.
Second, buy the large turkey roasting bags at the grocer.
Third, when making these only par-bake them at 350 for between 8-10 minutes until lightly cooked.
Then cool completely, bag and put in the freezer. Stack them inside the turkey roasting bag, twist tie and freeze! Ready to be used when you’re short on time, but don’t want to short change your family on healthy food!
Then when you have only 15 minutes to have dinner on the table – pull one out, decorate as you like and bake for about 10 minutes at 400 degrees. Within less time than it takes to drive to the take-out pizza place you’ve got a far healthier and budget friendly dinner ready to go!
By using freshly milled whole wheat – you also enjoy the flavor of the pizza without the over powering taste of the bagged whole wheat flour ruining the sauce, cheese and toppings! So if you’ve not thought of a mill you’d like yet…please view our GRAIN MILL COMPARISON CHART to get started!
") In videos, recipes and general conversation around my home, when we say the words, “whole wheat”, we only mean freshly milled whole wheat.
In videos, recipes and general conversation around my home, when we say the words, “whole wheat”, we only mean freshly milled whole wheat.
When we say flour, we mean freshly milled whole wheat flour.
We just don’t use any other type.
Dead-Whole-Wheat-Bagged-Flour has oxidized as it has sat in the bag. Also the miniscule amount of vitamin E (wheat germ oil) left after the majority of it being stripped from the grain during processing (for shelf life) has begun to go rancid. That is the bitter taste.
We have not used bagged whole wheat flour or bagged enriched white flour for YEARS. However, when sharing recipes, we may often simplify by just saying whole wheat or flour, but we always mean flour that has been freshly milled at home from the whole grain of wheat.
Coming soon is a brief video explanation of WHY we use freshly milled whole wheat flour on our YouTube Channel. Go subscribe to that channel to be more informed!
 Low gluten and gluten-free items can be very expensive to buy in the store. So if you want to know what you’re getting and if it ‘s right for your gluten-free or lower gluten diet, it would be good to learn a little more about the grains you can use. I began my journey in home-milling because of a diagnosis of gluten sensitivity. Thankfully I found it was the processing of wheat flour that was my issue, not the gluten (as is the case in many people’s mis-diagnosis) and I can again eat freshly milled whole wheat. But I did learn of several grains that work well for a lower gluten or gluten-free diet.
Because these grains all contain a trace to no gluten, they will all require some kind of binding agent in the recipe in which you use them. Gluten protein forms strands to hold dough together when baking. These grains do not have those strands so you cannot replace the milled flour of a low to no gluten grain exactly for wheat flour.
Millet (pictured above) is one of the staples in a gluten free diet. Millet can be cooked as a replacement for couscous (which is a wheat pasta, not a grain) or milled into a flour.
Quinoa is another low gluten grain. It is very high in protein and also cooks well whole.
Rice is a gluten-free grain. When milled the flour is very fine and suitable for thickening sauces.
Rye is an extremely low gluten grain. The flour is suitable for baking flat breads and using in batter bread mixtures.
Corn is low gluten. There is a trace amount of gluten & starch in some corn meals.
Oats can contain a trace amount of gluten. If you suffer from Candida or Celiac’s , be sure the oats you purchase are labeled ‘Gluten-Free’ since not all oats are gluten free.
Spelt is another grain often used in low to no gluten diets, but it does indeed have trace amounts of gluten in it. It can be kneaded but only for a short time after which over kneading causes the dough to become very sticky.
Kamut is not low or gluten-free. Kamut is an ancient grain akin to today’s wheat derivative.
Let me encourage you that if you have been diagnosed with a gluten sensitivity or a gluten intolerance, you may be able to enjoy whole wheat bread again if you mill the wheat at home and use it fresh. However, if you have been diagnosed with Candida or Celiac’s consider milling these low to no gluten grains at home to save yourself some money and give you variety in your diet.
I hope you’ve had the chance to view our daughters’ video: Pancakes from Scratch. Below the video is the (whole) recipe and a little history behind this recipe that is a Miller Family Weekend Staple.
Usually every Sunday, we have either Whole Wheat pancakes made from scratch or Whole Grain Waffles made from scratch. As the girls show you above, it is actually quick and simple to mix all the dry ingredients together in one container and all the wet ingredients together in another the night before and have easy, almost instant Whole Wheat Pancakes faster than a box mix.
Heart-healthy Whole Wheat Pancakes
Wet Ingredients:
2 1/2 Cups of Low Fat Buttermilk
1/2 Cups Egg Whites
2 Whole Eggs
1/4 Cups Canola Oil
1 tsp Vanilla Extract
Dry Ingredients:
4 Cups Fresh-Milled Whole Wheat (white wheat) Flour
2 tbsp Sugar
1 tsp Baking Soda
1 tsp Salt
2 1/2 tsp Baking Powder
Just follow their lead for instructions!
If you have left over pancakes (we do that on purpose) allow them to cool on a cooling rack and place in a zip-lock bag with wax or parchment paper between them and freeze. They pull out singularly and toast in a toaster to the perfect pancake once again! Great for those mornings on the go!
By the way, the ‘Yellow Bowl’ featured in many of our videos is the famous yellow bowl that has been in my newsletters before. It is one of the inanimate objects I would try to grab in a house fire. The reason is because it was one of the first things given to me by my mother-in-law (who also influenced my and the daughters’ love of cooking) and because we have so many family meals together that the beginnings of which start in that yellow bowl. It, it priceless only because it links me to my greatest gift on earth, my family.
I hope you enJOY and become a part of the Millers Grain House extended family by subscribing to our Newsletter. You’ll get free recipes!!

Share Your Favorite Recipes!
We always love hearing from our extended family (you) at Millers Grain House! We are very excited about the new addition of a whole grain recipe section! We’re going to need you to help us build and share it!
The best part about submitting your whole grain recipes is that we will be testing and trying a few in our own test kitchen. Who knows, your recipe could end up in one of our videos or on our newsletter! Even if we tweak it (it’s always fun to play with a new recipe) we’ll give you the props for sharing it with us!
Whole grains don’t have to be boring and we know you can help us widen the variety of uses! We are looking forward to sharing, testing and TASTING what you share with us!
Go HERE to submit a recipe! Put the words WHOLE GRAIN RECIPE in the subject line.
 It wasn’t too many years ago that every morning moms around America would wake up early to put bread in the oven, or shuffle into town to the local bakery. Homes across the country would have the unique aroma of freshly baked bread.
While we are all thankful for the convenience of store-bought and pre-sliced bread today, there’s still nothing that compares to the smell and taste of a wonderful loaf of home-cooked bread.
Bread baking is an art, one that inspired Donna Miller to help pass it on to other families through Miller’s Grain House and her new e-book, Whole Wheat Bread Making.
Making your own whole wheat bread has several benefits:
- Simple enough for everyday, but delicious enough for special occasions.
- Your kitchen is filled with wonderful aromas.
- Making your own bread is healthier than preservative filled bread.
- Homemade bread tastes wonderful.
- Kneading bread dough is a great stress relieving exercise, and a great alternative to physical violence against the causes of your stress. (Offspring and spouses in particular.)
- Delicious satisfaction following a job well done.
- There is a wonderful smell from the cooling rack.
- More economical than store-bought bread.
- Huge variety of uses from simple toast or sandwiches to gourmet dinners.
- … And did we mention the amazing smell!
This e-book walks you step-by-step through every detail of becoming a master bread maker. It is filled with 40 pages of instructions, tips, detailed photos and diagrams showing you how to make a variety of whole wheat breads. Whether you prefer hand kneading or using a bread machine, you’ll receive detailed instructions. You’ll learn how to make perfectly formed the loaves with bakery perfection, and do free-form baking without a pan. You’ll learn kneading and folding techniques. It will help you choose the best bakeware and what to look for in a bread making machine. You’ll learn everything from setup to clean up. We teach you the proper way to slice bread without tearing. And… you will learn to make hoagie rolls, hot dog buns and hamburger buns.
Whether you want to make bread once a day or once a year, you’ll love this resource.
Donna Miller is a teacher, author, and talk radio host with two weekly broadcasts specializing in encouragement in the kitchen.
Donna’s e-book, Whole Wheat Bread Making, is available for instant download today for only $9.97. Downloaded to your computer, iPad or Kindle and get ready to bake.
Order the Make Bread e-book today! Order Here
Warning: Excessively awesome smells from your kitchen tend to attract neighbors, friends, and family. Miller’s Grain House cannot accept responsibility for the appearance of bread loving moochers. Possible side effects include: unwillingness to settle for store-bought in the future, improved health, random hugs and kisses from family members. Bake at your own risk!
FOR A SELF-SUSTAINING LIFE


