
![]()
Parmesan-Herb Bread
2lb Loaf Recipe
Ingredients:
- 1 ¼ Cup Warm Water (100-110 degrees)
- 1 Tablespoon Oil (Olive, Canola, Safflower or Sunflower)
- ¼ Cup Sweet Stuff (Sugar, Honey or Sucanant)
- 1 Medium Egg
- 3 ½ Cups of Flour (this can be any combination of Whole Wheat and White Bread Flour – best for newbies to start out with 1 ½ Cups White & 2 Cups Whole Wheat)
- 1/4 C Grated Parmesan Cheese
- 1 TBS Oregano
- 1 tsp Onion Salt
- 1 tsp Garlic Salt
- ¼ Cup Gluten
- 1 ½ teaspoon Fleishmann’s Instant Yeast
- Another Egg & 1 TBS cold Water for Egg Wash
- Another 1/4 C Grated Parmesan Cheese
For Bread Machine: Put ingredients in in order given and set to
‘Dough Setting’ – now go fold clothes, vacuum and clean the shower
(o:
By Hand or with Mixer/Dough Hook : Mix all the water, oil, egg and sweet stuff together in your mixing bowl. Proof your yeast in the whole liquid if you want to. Instant yeast does not HAVE to be proofed (let get bubbly) but it won’t hurt it if you do. In a separate
bowl, mix all your dry ingredients (flours, gluten, salt and yeast
if you didn’t proof it).
Slowly add each of the dry ingredients to the liquid stirring until too hard to use a spoon, then start the hand kneading process (or if in the kitchen aid – start the dough hooks, or if in the Bosch Mixer…follow directions for kneading).
Knead (by hand, by hook or by Bosch ) minimum 10 minutes – up to 15 minutes – until dough feels elastic and looks silky-like (or in
Bosch Mixer – it pulls away from the sides).
Cover bowl with a clean cloth towel.
Let dough rise once in the bowl in semi warm place approximately 30 minutes or until double the size it started.
LIGHTLY punch it down to get all the air out after it rose the
first time.
(All above steps are usually done on ‘Dough Setting’ of your bread machine)
Turn out onto AN OILED (not floured – it makes it heavy and dense)
surface to REST for 5 minutes (this helps the gluten that has
formed to relax a bit and not ‘crack’ the crust).
Now form your loaf by flattening by hand, and rolling up like a
‘jelly roll’ and after tucking ends in and seam side down, place it
into a greased loaf pan.
Beat the 1TBS cold water in with one egg in a small bowl and brush the top of the loaf. Sprinkle with a light dusting of Parmesan Cheese.
Cover the pan with a clean towel and let rise in a semi-warm place
another 30 minutes.
Last 10 minutes of rising, preheat oven to 350 degrees (be sure
your racks are placed so that loaves bake in the middle of the
oven).
Bake 18-22 minutes in center of the oven. Start checking for
golden tops and ‘hollow’ sound when top is tapped at about 18
minutes.
Take out of pans and cool on a wire rack.
Wait at least 10 minutes before attempting to cut – or it smooshes!
If you can wait that long after smelling it bake! Use a serrated
knife for best results in cutting.
Use a good olive oil and balsamic vinegar for dipping!
Other shapes/uses:
This same recipe can be many smaller shapes. Simply shape differently and bake approximately 15 minutes on 350.
Cloverleaf Rolls – about 12 – divide into 12 equal weight balls of dough. Then separate each each ball into three equal balls. Place all three in the base of a greased muffin tin. Fill each muffin tin with the 3 small dough balls made from the 12 larger dough balls. Brush with egg wash and top with the Parmesan Cheese. They will rise and and fill the muffin tin cup in about 30 minutes. Bake 15 minutes on 350. Cool on wire rack and store in airtight bag.
Herb Sticks – about 12 – divide into 12 equal weight balls of dough. Roll like a thick play-doh snake and place on a baking sheet not touching. Brush with egg wash and top with the Parmesan Cheese. They will rise and touch in about 30 minutes. Bake 15 minutes on 350. Cool on wire rack and store in airtight bag.
Dinner Rolls – about 24 – divide into 24 equal weight balls of dough. Make a ‘domino’ sized oblong dough ball with creases on the bottom and place in a casserole dish not quite touching. Brush with egg wash and top with the Parmesan Cheese. They will rise and touch in about 30 minutes. Bake 15 minutes on 350. Cool on wire rack and store in airtight bag. These will pull apart easily.
For step by step pictures and instructions of my FAVORITE way to shape and serve this recipe (Rosettes pictured below) be sure to see the instructions below.
 |
Shaping the Rossettes
Divide dough into 6-8 equal weighted balls of dough. Then take one and form a ‘snake’ about 1 to 1.5 inches in diameter.
|
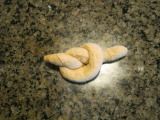 |
Then tie a ‘knot’ in the center of the ‘snake. It should look something like this.
|
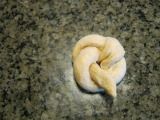 |
Then bring the longer end over the top of the dough knot tucking it into the center hole of the knot.
|
 |
Then bring tuck the remaining shorter end (see above) under the knot and pinch slightly into other dough to hold. This one has been transferred to the cookie sheet already.
|
 |
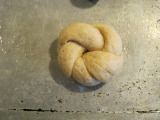
The finished product dusted with Parmesan and ready to eat!
|

You know that phrase made famous by the Vikings in the Capital One commercial? “What’s in Your Wallet?” – Well, let me ask: “What’s in YOUR Fridge?”
On any given day that may be a scary question for some – but for most of us after  Thanksgiving, it’s not only scary, it’s a downright daunting and overwhelming question!
The answer is a resounding LEFT OVERS!
When faced with a myriad of foods that you don’t normally eat during the year, left in odd amounts hiding or sliding around after Thanksgiving, some of us may be tempted to toss the left over food, given the turkey coma we have just induced. But do not despair… There are many things you can do with left over Thanksgiving goodies so you won’t waste your food budget by feeding it all to the dog.
Mashed Potatoes:
Portion them out into one cup servings, into baggies and freeze. When you need to thicken a soup, top a pot pie or simply have a quick side dish (seasoned with cheese, chives, garlic, etc) – these are quickly thawed and used.
Sweet Potato Casserole:
Portion this out into one half cup servings, into baggies and freeze. These make great additions for muffins and can be added in to winter squash soups. Again they are a stand alone side dish at a far later date.
Green Bean Casserole:
Given that this is usually laden with mushroom soup and fried onions – it usually doesn’t keep well for too long. Plan on tossing this into your turkey pot pie as an added green veggie and cream soup base. The onions will soften and blend with the other ingredients…no one will know that you used it there.

Cranberry Relish/Jelly:
Also another great add-in for muffins. It turns your muffins a sweet pink and you don’t have to add as much sugar as the usual recipe.
Turkey:
I’m not sure why we always have way more turkey than I think we will. After days of turkey sandwiches – it’s still HERE! So here are some thoughts…
Break the bones with the meat on them, boil and make broth that can be frozen or canned.
Then de-bone all the meat you can glean (we ended up with a gallon bag of bits) and make any number of things such as turkey and rice soup, turkey pot pie, turkey salad for wraps or sandwiches, turkey tacos (use taco seasonings), turkey barbeque on a whole wheat bun. Yes, all of these are on the menu for the next few weeks at our home. Simply label and freeze portion sizes to make the specific meal.
Once you’ve tended to the left overs and they are in their proper place (not hiding in the fridge or trashed) you can move on to some more ‘normal’ meals and enjoy the fact that you can give Thanks for having this other food on hand!
 Donna Miller is a teacher, author, sought-after speaker and trainer. She has been a both guest and host on internet and broadcast radio talk-shows and in television interviews. She enjoys teaching online and local classes & ladies retreats for people to learn whole food cooking, budget friendly techniques and preparedness skills. Donna is happily married and has three adult children, and a daughter in-law. She and her husband (Joseph) are the founders of both Millers Grain House , Your Preparation Station and are on the board of PREPARE Magazine.
We were recently asked this question. We hope that by sharing the anwer with you – we are able to help you as well.
") ————————
————————
Hi guys. Love the info! My storage spot is the garage but Summer gets hot. Am I ruining the grains I’m starting to store?
————————
Answer:
Thank you for contacting us and for your kind remarks! We’re delighted to be of service.
Ruining? Not really. But you may be shortening the life of them.
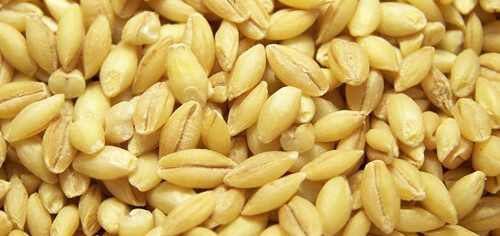
Grain stays intact and fully nutritious at approx 80degrees at the hottest. Over that temp it begins to decompose/breakdown.
If the wheat germ oil inside gets consistently hot then cool then hot then cool it will make the wheat bitter tasting and thus, not so good when you go to use it. It may also not ‘act’ like regular flour either due to the density of the oil after prolonged heat.
Indoors. In dark or no exterior windows. Dry. Away from any heat source. No hotter than 80 degrees F. Is the optimum way to store grain to last for hundreds of years.
Hopefully this helps answer your question!
—
Joseph & Donna Miller, Owners
Millers Grain House
Thank you for allowing us to serve you. It is our pleasure!
Deut 28:5 – “A blessing upon your grain-basket and kneading-bowl.”
Feel free to contact our office via email or call during business hours.
Mon – Thurs 9:00-5:00, Fri 9:00-4:00 Eastern Time (Closed Sat & Sun)
![]() 1.828.536.4988
1.828.536.4988
Come Visit the NEW Millers Grain House – https://www.millersgrainhouse.
Free Video Encouragement – http://www.youtube.com/
Free Radio Show – Encouragement in the Kitchen – http://www.blogtalkradio.com/
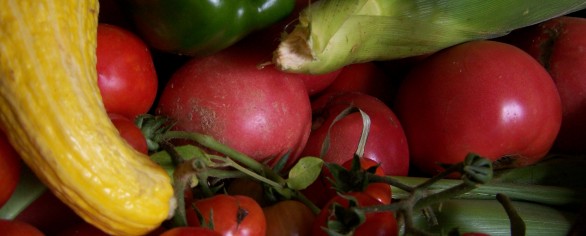
Consumers practically need a PHD to read the labels on boxed items, so buying whole foods is usually easier to decipher right? Not always. We practically need a decoder ring to clarify those tiny stickers on produce.
 Have you ever tried to figure out what is the most healthy produce to buy? An apple is an apple is an apple, right? Well, maybe not. Let me help you with decoding the produce codes.
A great way to identify organic products, which must be produced without the use of antibiotics, synthetic hormones, genetic engineering and other excluded practices, is to look for the USDA organic label. There is a wide amount of wiggle room on percentages and understanding of USDA regulations for learning what these seals mean, so we will discuss the USDA organic labeling and seal in a separate blog.
Most produce in the market has a small sticker or a bar code with 4 to 5 numbers. It’s time to take out your decoder ring, your paper and pencil and put on your spy glasses and trench coat.
We’re going to take a look at just the first number to know what you are getting:
- If it starts with the number “8” at the front of a (usually) five digit number = It is Genetically modified (DNA altered) and is not grown organically or certified organic (has pesticides).
- If it starts with the number “9” it is usually a five digit number = It is Organically Grown and non GMO.
- If it starts with “3 or 4” and usually a four digit number = It is conventionally grown (with some pesticides), not usually genetically modified (thus is non-GMO), but is not grown organically or certified organic (has some pesticides).
In closing, I shall leave you with a (cheesy) little rhyme to use instead of the spy garb to help you remember how to decipher the produce codes:
The number nine (9) is always fine.
Three or four (3 or 4) might be allowed through the door.
If you can come up with a better memory system, by all means please HELP ME and please leave a comment!! (o:
Best Blessings!
Donna Miller, Owner of Millers Grain House

I’ll be the first one (okay, no my FAMILY would be the first ones) to tell you that I used to HATE admitting I made mistakes! To the point of vehemently arguing that it was not a mistake at all (even if I really knew I’d made a major booboo). Years, maturity and wisdom finally worked into my thick skull (and God worked on the pride thing) and I actually now embrace (some of) the mistakes I make as abilities to grow and learn. The kitchen is one of those areas in which I actually love to make mistakes. As long as no one gets hurt.
Today we are doing the Miller House tradition of Fridge Purge. Which means – I am not going to buy more refrigerated groceries until we make some room. So meals get creative. I had about 8 stalks of cooked asparagus that no one was going to eat and would be headed for the trash by Saturday if I didn’t come to the rescue and FAST.
Also – several days ago I had a failed attempt at Sour Dough Bread. Don’t ask me why but that stuff alludes me every time. But no way was I tossing that whole loaf out just because it was squatty. So it became Melba Toast (in the Excalibur Dehydrator). All I did was slide the loaf very thin. Brushed both sides with a tad bit of olive oil and dehydrated until crispy.
So here is the super frugal lunch that came out of it my mistakes and left-overs:

Please don’t ask for a real specific recipe – because I measured nothing – just started tossing in the ingredients and out came a very creamy, delicious Cream of Asparagus Soup (with Melba Toast) for two!
Basically it was the 8 cooked spears in enough fat-free milk to cover, cooked on low until softened. Added about 1tsp of garlic grape-seed oil and seasoned with garlic salt, onion salt and savory to taste. Then let simmer just a few minutes.
With a stick blender, I whirred the mixture until most of the spears were ground up nicely. I then took 1/4 cup(ish) of cold milk and mixed about 2tsp of Arrow Root Powder into it – poured that mixture into the hot soup and stirred until thickened.
Put it in the bowl, topped with fresh chives and two home-made Melba-Toast by mistake slices for dipping and Tah-Dah! I took that picture to share lunch with you! (o: The other serving went to my particularly picky daughter – who actually liked it!
It actually tasted like it had a cheese base but it didn’t. For those who are dairy free – we you could use non-flavored or sweetened rice milk, almond milk or coconut milk.
For more photos of this visit our Millers Grain House Facebook Page – and “LIKE” the page to see more!
I hope you don’t throw out your mistakes or you tiny little left-overs *until they grow stuff on them or smell bad* – but that you use your imagination to embrace your mistakes and make something surprisingly pleasant out of them!
Best Blessings!
Donna
Home  Canning has been around for far longer than our store-bought canned products of today. It is an old skill that is making a come back during these tougher than normal economic times. And why not? Buying fresh foods and learning how to make them last long into the next few seasons is often the most economical way to eat without attempting to live off of preservative laden boxed mixes.
The history of canning can be traced back as far as Napoleon Bonaparte in the 18th century. He experimented for over 15 years and finally realized that if food is sufficiently heated and sealed in an airtight container, it would not go bad. Wine was among his very first commodities to attempt to preserve in this manner. I mean, priorities are priorities, right?
Although this skill may seem a bit old fashioned it is gaining new ground as grocery prices rise. Men and Women from their 20’s to their 60’s are learning this fine art of food preservation. It is as safe as it is ‘green’ (earth friendly). The cans are reusable glass and do not leach BPA into the food like the white lining of the commercial cans do. Even the lids don’t have to be tossed if you purchase the Tattler Lids (also BPA free). This is much better on our environment and our bodies.
The difference between water bath canning and pressure canning is easily determined by the acidity of the food. There are several good (and reasonably priced) books to help you know which method to use and how long to process the food. There are also tools of the canning trade that you can get for less than you may think, making the home canning process an old skill that will help you stretch your food bill for seasons to come.
With a little practice, you can easily both pressure can or water bath can almost every single food you may need. The food then stores for years without the aid of electricity.
If I can can – then you can can – we can all can!
Blessings and enJOY the journey!
 One of the biggest joys of freshly milled whole wheat at home is experimenting and finding out just what can be made. Having the whole grain on hand, milling it and using it in a variety of ways just opens the doors wide for budget stretching and nutrition!
I used to think that English Muffins were one of the most difficult things to make. I mean, look at them! They are small discs of toasty goodness with the pull apart texture that makes them toast better than any slice of bread. Not to mention, we have always made Egg-Mc-Miller-Muffins for special occasions and I was afraid I’d mess things up by trying to make a Whole Wheat English Muffin. Boy, was I glad to be WRONG!
The May 31st Newsletter will have the full recipe and steps for making your own whole wheat English Muffins. Trust me, if I could do it – you can do it! So be sure you’re signed up for the Newsletter. Also, we’ll be  having a live video class on this – so you can see the techniques and ask questions! We’ll notify you of that class in the newsletter too!
I’ll leave you with my favorite picture from my adventures in Whole Wheat English Muffins!
EnJOY playing with your food! You may never know what you can do until you try!

Home-made Whole Wheat (freshly milled!) Pizza Crust can be made easily ahead of time to make even the most hectic evening meals both fast and healthy. With variety and choices of toppings it can be a great family pleaser! I mean, who doesn’t like to choose their own toppings on pizza, right?
From fresh herbs to your own simply made tomato sauce (ground tomatoes) there are endless possibilities to toss on top of this crust and have dinner in a flash. The secret is making several of these healthy crusts ahead of time and freezing them!
Here’s the simple way to do it.
First use freshly milled whole wheat in your favorite recipe. You can see mine on our VIDEO ARCHIVES.
Second, buy the large turkey roasting bags at the grocer.
Third, when making these only par-bake them at 350 for between 8-10 minutes until lightly cooked.
Then cool completely, bag and put in the freezer. Stack them inside the turkey roasting bag, twist tie and freeze! Ready to be used when you’re short on time, but don’t want to short change your family on healthy food!
Then when you have only 15 minutes to have dinner on the table – pull one out, decorate as you like and bake for about 10 minutes at 400 degrees. Within less time than it takes to drive to the take-out pizza place you’ve got a far healthier and budget friendly dinner ready to go!
By using freshly milled whole wheat – you also enjoy the flavor of the pizza without the over powering taste of the bagged whole wheat flour ruining the sauce, cheese and toppings! So if you’ve not thought of a mill you’d like yet…please view our GRAIN MILL COMPARISON CHART to get started!
 Last week I began my show on choosing, using and storing healthy oils only to discover 3 minutes before the show was to end that my microphone was muted. Needless to say, this is now the topic of the upcoming radio show!
Choosing, storing and using healthy oils is the key to making good choices in your diet. Your health is not only affected by the type of oil you choose, but also how you use it. Over heating can actually turn a good fat into a bad fat (trans fat). Storing oil is also vital to making sure you don’t get sick by using oil that has gone rancid.
Fat and oil have gotten a bad wrap over the years. The truth is that not all fats are created equal. Your brain, your hair, your skin and your arteries need healthy oils and healthy fat to function properly. The key is learning what choices to make and what to stay away from.
I will share with you a bit more information about healthy oils! Some of the topics that will be touched on are:
- What are the smoke points of oils and why is that important information?
- Should you worry about the fat content and type?
- Decipher single chain, Mono-Unsaturated Fatty Acids.
- Is there such a thing as a healthy saturated fat?
- How to spot ‘impostor olive oil’ in the grocery isle.
- What about the spray oils or non-stick sprays?
Stop by our Facebook Page if you have specific questions about this topic and leave a comment/question.
") In videos, recipes and general conversation around my home, when we say the words, “whole wheat”, we only mean freshly milled whole wheat.
In videos, recipes and general conversation around my home, when we say the words, “whole wheat”, we only mean freshly milled whole wheat.
When we say flour, we mean freshly milled whole wheat flour.
We just don’t use any other type.
Dead-Whole-Wheat-Bagged-Flour has oxidized as it has sat in the bag. Also the miniscule amount of vitamin E (wheat germ oil) left after the majority of it being stripped from the grain during processing (for shelf life) has begun to go rancid. That is the bitter taste.
We have not used bagged whole wheat flour or bagged enriched white flour for YEARS. However, when sharing recipes, we may often simplify by just saying whole wheat or flour, but we always mean flour that has been freshly milled at home from the whole grain of wheat.
Coming soon is a brief video explanation of WHY we use freshly milled whole wheat flour on our YouTube Channel. Go subscribe to that channel to be more informed!
FOR A SELF-SUSTAINING LIFE


